Happy Dancing

Happy Dancing

Thursday, September 30, 2010

FREE TUTORIAL THURSDAY!

Add your creativity to a pre-made bag and learn the secret to
make the versatile embellishment shown on the left:


Visit the Hero Arts blog and watch the video today!
Click HERE to view.


....and I had a chance to use this tutorial and some K&Co. DSP
to make this version today:


Sunday, September 26, 2010

Side Step Halloween Dresser Card

Here's a card that will be sure to give your friends the WOW! factor when they open up your Halloween card! I used Jackie Topa's side step dresser card idea to make this Halloween version. (Her fantastic video tutorial can be seen HERE.)
INSIDE THE CARD:

I used Stampin' Up's Itty Bitty Backgrounds for the tiny background black dots on the sayings, their Vanilla Shimmer Smooch mist to give this card an ethereal look, Martha Stewart's bat punch with two mini gems for the eyes, the SU Curly Label punch and the SU Scallop punch for the decorative edges on the front of the card (but you can improvise with any punches you already have.) The inside saying was done on my computer.

Sunday, September 19, 2010

BLOG CANDY WINNER

To celebrate reaching over 20,000 hits since I started this new blog in April, I'm so happy to report that Terry O. of Sunnyvale, CA is the blog candy winner in a random drawing - #129 out of 143 subscribers and blog followers! Terry --- I'll be contacting you ASAP to get all of the loot to you!...and MANY thanks to all of you for stopping by my new blog!


Friday, September 17, 2010

Class this Sunday!


Learn how to make THREE projects using an envelope at my class this Sunday! The project shown above also makes a great CD/DVD storage sleeve. See the how-to demo and get exact measurements to make your own! View class topics and registration information in the left column. Hope to see you there!

Thursday, September 16, 2010

Masculine Birthday Card

Have you ever made a card and then had a hard time giving it away? That happens to me quite often, so I usually make more than one of the same card while I've got everything out....but this card was a one-of-a-kind and I never got around to making another one....so, it's been in my blank card box for ages because I could never give it away....until now! My brother-in-law's birthday was last week and enough time had passed by so I could finally part with it! 


I masked each rectangle with Post-It Notes at the top and bottom and used the same stamp for all 3 images --- changing the direction of the stamp on each rectangle. It's actually a quick and easy technique --- I don't know why I didn't make two!


Stamp Set: Close to Nature from Stampin' Up

Friday, September 10, 2010

Thank You Cards


I was surfing on the net and came across the lovely card below by Becky TE and stopped everything to try a version of her beautiful card. I needed a thank you card and this turned out to be such a wonderful source of inspiration --- Thank you, Becky! The red and green version would also make a great Christmas thank you card --- Oh, wouldn't it be great to be THAT organized and get them done ahead of time?! (No...I'm not THAT organized!)


BTW - See those teeny tiny gems in the center of the flowers above? In my upcoming Sunday, September 19th class at Scrapbook Island (408.978.8900), I'll be showing a clever way to place those mini gems with precision and without them sticking to your fingers instead of the paper! (Click each photo to see a close up, then click on the back arrow)


Thank you stamps from THE STAMPS OF LIFE, border punch from MARTHA STEWART, leaf and flower punch: STAMPIN' UP!


Monday, September 6, 2010

My Favorite Things


This panda bear and the "LOVE" black frame were made with one of my all-time favorite Cricut cartridges called Pagoda. I LOVE panda bears and if you look closely, you'll see a panda head in the "O" of "Hom" in my watermark! I cut a small piece of green cardstock to make a piece of bamboo for the panda's mouth and added opaque white ink (by Uniball) for the eyes. The inside of this card and the envelope are shown below. The stamp set I used is called Asian Influences by INKADINKADOO.


Thursday, September 2, 2010

Anniversary Card for a Special Couple


It's my wonderful in-laws' anniversary, and when I saw this cute Asian couple over on Patti's blog, I knew they would love a card like this! They are always so happy every time I make a card for them, and I hope this card will make them smile from ear-to-ear! Patti is one clever paper crafter, and you will love seeing her giraffe made out of punches ---- just click HERE to go to her punches blog post to find the recipe for this Asian couple and the giraffe.
Background Paper: Sizzix Square Lattice Exclusively for Stampin' Up
Nesties: Labels 3, Small Scallop Ovals, Small Classic Ovals
Punches: Three for You flower punch and Label Punch (SU), 1/2", 1" and 1 1/4" circle punches

Thursday, August 26, 2010

Bat Boxes Photographed in a Light Box


In my upcoming September 19th class, I'm going to demo how to make a light box to professionally photograph any item with an infinity background as shown in these two photos.


I made these little treat boxes to hold a wrapped Hershey's Nugget based on an idea I saw online. I've modified the original idea so I can crank out these Halloween treat boxes using my Walk in My Garden Cricut cartridge (see page 129 in the booklet, use the shift key and cut on size one and a half). To begin, cut out two identical shapes from the same medium weight DSP (Designer Scrapbook Paper). This Cricut envelope shape has one flap that is larger than the other three. Cut off 1/4" from the end of each of the three smaller flaps on both DSP pieces as shown by the red arrows below. Using a bone folder, fold in the flaps on all four sides. Punch a 1/2" circle in the center of the larger flap on both DSP pieces. On one of the DSP pieces, place adhesive on all flaps EXCEPT the larger flap as shown by the red arrows below. (I used Crystal Effects for the adhesive.) 


Join the two pieces by adhering the flaps opposite the larger flaps with the holes, then adhere the remaining flaps by bringing up the sides and placing the box base on a flat surface. Be sure all sides are properly aligned when adhering the flaps so that the box will stand up properly. Cut a 1 1/16" length of the same DSP and adhere it around a Hershey's Nugget. 


Place the wrapped candy inside the box
and secure the box handles with a piece of ribbon.
You can find this wonderful gold-edged black satin ribbon at
Scrapbook Island in their HUGE ribbon section!

The Details:
Stamp: Batty for You (Stampin' Up)
DSP: La Creme Matstock (DCWV)
Punch: Bat Punch (Martha Stewart)
Mini gems for the bat eyes: Scrapbook Island
To see the original project, click HERE

Sunday, August 22, 2010

My Sons' Favorite Cookies!

In my Paper Crafters' Tea Party classes at Scrapbook Island, I always provide a tasting and recipe for a Hom Family favorite recipe. To promote my classes, here's a recipe below that tops the list for my sons' favorite cookies (and was the favorite cookie of their tennis teams as well). Because there are no eggs in this recipe, the dough can be eaten before cooking (if you're like me and LOVE raw cookie dough)! For my next Paper Crafters' Tea Party Class in September, I'll have a tasting and recipe for a dip to serve with fruit slices that is to die for! It's a dip that will be certain to make all of your guests VERY happy this Fall Season!

HERSHEY'S KISSES COOKIES
MAKES ABOUT 4 DOZEN COOKIES


Ingredients:
1 bag (10 oz.) Hershey’s Kisses
or Kisses with Almonds
1 cup (2 sticks – 8 oz.) butter
1/2 cup (3 ½ oz.) granulated sugar
1/2 cup (4 oz.) packed light brown sugar
1 t. vanilla
2 (10 oz.) cups all-purpose flour
1 cup (6 oz.) mini semi-sweet chocolate chips
Plus for the Chocolate Drizzle:
1/4 cup (1 ½ oz.) mini semi
sweet chocolate chips
1 T. Crisco shortening


Directions:
Heat oven to 375º F. Remove foil wrappers from kisses. Beat butter, sugars, and vanilla until well blended. Add flour and blend until smooth. Stir in chocolate chips. Mold a teaspoon of dough around each chocolate kiss, covering completely. Shape into balls, and with the point of the kiss facing up, place onto a cookie sheet lined with Release or non-stick foil and bake for 10 minutes or until set. Only the edges will be golden brown - do not over bake! (See the picture above.) Remove foil sheets to the counter and off of the cookie sheets. Let cookies cool slightly. Remove cookies to a cooling rack. Fold foil sheets over in half and line up cookies side-by-side. Drizzle chocolate across tops using the handle end of a fork (see recipe below). Transfer to fridge or freezer to set chocolate drizzle. Remove after 10 minutes.


Chocolate Drizzle:

Place 1/4 cup mini chocolate chips and

1 T. shortening in small microwave-safe bowl or cup.

Microwave on high for 30 secs. – stir well. 

Continue to microwave at 20 sec. intervals - stirring in between intervals -

until chocolate is melted and smooth when stirred.


Ounces are given in the recipe for those who have
discovered the joy of baking with a digital baker’s scale.
I'll be giving a how-to demo on digital scales
in my November class!

Monday, August 16, 2010

Alice's Birthday Card AND Contest Won!


Many of you know my SUPER talented card making friend, Alice, and it was her birthday last week. I wanted to make her a special card because I knew she would appreciate every little detail. This is a surprisingly quick way to make the ever popular side step cards. I'll be showing this simple technique in my September 19th Paper Crafters' Tea Party Class so you can make them to WOW your friends and family!

....and yippee!....over the weekend I found out that I had won 1st place in a challenge contest by Really Reasonable Ribbons for this card: 

FOR THE DIRECTIONS to make this card, click HERE.


Really Reasonable Ribbon

Friday, August 13, 2010

Variations on a Black and White Theme


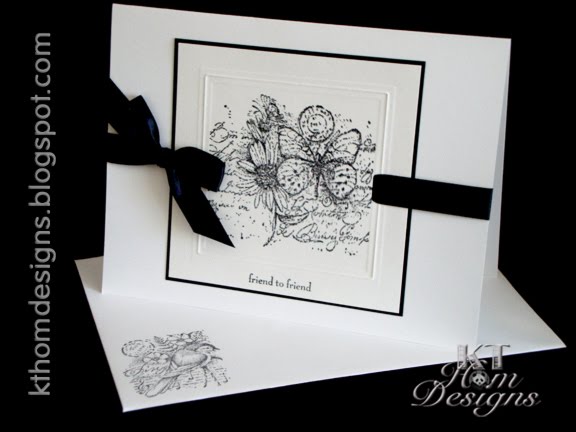
Here are a few variations on my all black and white card posted HERE. I used SU's Garden Collage stamp set (retired), but you could try a black and white card with just a few parts of any stamp highlighted with color. It makes for a quick and easy card and spotlights the most important aspects of the stamped image. 

Color was added with the following Copic markers for the sunflower:
and for the butterfly:

...and finally...Crystal Stickles were added to the butterfly wings along the veins to add some bling to the final appearance.


Be sure to visit the Really Reasonable Ribbon blog and their current black and white challenge for more inspiration by clicking HERE or check out their current challenge at http://reasonableribbon.blogspot.com and click on the current challenge box in the upper left corner.

Nestibilities: Small Classic Scallop Rectangles, Small Classic Rectangles and Labels 4
Sizzix: Square Lattice Embossing Folder (A Stampin' Up exclusive) 

Sunday, August 8, 2010

20,000 Hits in 4 Months!

It's time for some...drum roll please....
SUPER SWEET BLOG CANDY!!! 
I can't thank all of you enough for visiting my new blog here and for attending my classes!
To show my appreciation....
I'm having TWO drawings! 

DRAWING NUMBER ONE for those who subscribe or follow my blog, the winner will receive a package mailed to you filled with approximately $25 worth of paper crafting embellishments plus the card shown below, and...


DRAWING NUMBER TWO for those who register and attend my September 19th Tea Party Class at Scrapbook Island (408-978-8900), you will be entered into a special drawing for this collectible made in England Wedgwood Peter Rabbit bowl below worth approximately $50 plus the card shown above!


THESE TWO RANDOM DRAWINGS will take place on Sunday, September 19th...so...sign up to receive my blog updates (in right column), and if you live in the Bay Area, call Scrapbook Island (408-978-8900) to sign up for my next Paper Crafters' Tea Party Class. (See class details in the right column.)


MANY THANKS to all of the paper crafters who have stopped by my blog for a visit! I hope you found a little something here that might have sparked your creativity and made you smile 


This card was made with the Stampin' Up Garden Collage (retired) set.

Friday, August 6, 2010

CAN YOU PART WITH SOME OF YOUR RIBBONS?!


Here's a card I made from an idea presented in the May/June 2010 Paper Crafts magazine. I am the absolute Queen of ribbon collecting and this card was a perfect way  to put a (very slight) dent in my stash of ribbons! (See a portion of my ribbon infatuation HERE.) 

To create your own version of this card, start with a piece of 2" x 6" long black cardstock then: 

  • Fold one end of a 2" long segment of ribbon in half and cut at an angle to create a banner-type end on the ribbon --- This step requires very sharp scissors!
  • Adhere a piece of red sticky tape along the back of the 2" long piece of ribbon
  • Pull off the protective covering on the tape and adhere your ribbon to the black cardstock so that the ribbon end (opposite the banner end) hangs over the edge of the black cardstock just slightly AND there is about 1/4" of black space from the top edge (so you have some room to adjust the black cardstock strip when you adhere it to the card front at the end)
  • Use the edge of the black cardstock and your sharp scissors to trim the ribbon exactly to the edge
  • Add additional ribbon strips approx. 1/8" apart until you get near the end of the length of black cardstock NOTE: Check the length of the black cardstock against your card length to see where to stop the last piece of ribbon (You may need to trim your card slightly to achieve ideal spacing on that last ribbon.)
  • Adhere the black cardstock to your card, trim it at the top and bottom as needed and add additional embellishments as shown
Experiment with different patterns, textures, colors, widths and ribbon with text!
...and a big shout out to REALLY REASONABLE RIBBONS.... I just entered this card into their latest ribbon challenge! Visit their cool blog and store websites at:
and

    Friday, July 30, 2010

    I Scream for Ice Cream

    Oh...how I love this stamp set! It's in the Stampin' Up Summer Mini Catalog and it's called Sweet Scoops. At first, I just wanted to have it to decorate the envelopes of birthday cards, but since I got this Martha Stewart border punch, I can hardly stop using this set and the punch! The "SWEET" on the front is a $1 stamp from Michael's, and the inside sentiment says "Have a sweet celebration!" which is part of the Sweet Scoops set. (It also includes a texture stamp to kiss the ice cream stamp once it's loaded with ink to give the ice cream scoop a horizontal texture.) To add some dots and bling to the card front, I used Silver Stickles Glitter Glue. Using Stickles is a GREAT way to add an extra finishing touch to your paper craft projects. I use the Silver Stickles to replace mini gems in many of my paper craft projects. Visit Scrapbook Island today to purchase Stickles in a variety of colors and textures...and while you're there...sign up for my September 19th Paper Crafters' Tea Party! See details in the right column.

    Monday, July 26, 2010

    My Next Paper Crafters' Tea Party

    REGISTRATION IS NOW OPEN for my Sunday, September 19th class at Scrapbook Island. Come and enjoy the fun of learning something new * All levels of paper crafters are welcome to attend! (The class info. and topics are listed in the right column of this blog.) 


    NOTE: Everyone who attends will receive a FREE pdf sheet of Halloween graphics! 


    Call Scrapbook Island today to register at (408) 978-8900. Learn how to make this versatile gift card below (shown with two different scrapbook papers and embellishments):


    Sunday, July 25, 2010

    Ribbon Weaving & Video Tutorial


    For my loyal blog readers, I now how have a video tutorial for this ribbon weaving technique. It looks a lot harder than it is to make, but it does take practice! Be sure to leave the left side of the ribbon about 3 inches longer than the right once you get to the breast cancer ribbon portion of the video....so grab a 2-yard piece of 1/4" wide grosgrain ribbon and view the video HERE. Written instructions by another talented crafter Sue Wilson can be found HERE.

    Monday, July 19, 2010

    I Love Palm Trees!


    I got to go to a wonderful card class myself last week given by my very talented friend, Brenda Keenan, and here is one of the cards from the class. FYI details: Stampin' Up Tropical Party stamp set (from the Summer Mini catalog) and Teeny Tiny Wishes, Log Cabin Smooch spray and the SU exclusive Sizzix Square Lattice Embossing Folder for the background. When I showed this card to my friend Alice, she said..."Wouldn't it look cute to put 3 brads in the palm tree to look like coconuts?!"....so I tried it and the answer is "YES!" Here it is with the brads added:
    Thank you Brenda and Alice!

    Sunday, July 11, 2010

    Swimsuit Cards

    The challenge over at Let's Capture Our Memories was to design a card for kids.....and as a guest designer for them this week, I came up with a swimsuit card. Here is the design with two variations:


    Depending on your paper selection and embellishments, the swimsuit designs you can create are endless!

    FREEBIE ALERT: 

    If you attend my Christmas in July class this coming Sunday, July 18th, at Scrapbook Island from 2 to 3:30 pm, you will receive the template to make this card with the instructions PLUS other freebies and prizes! To register, simply call Scrapbook Island today at (408)978-8900. The class content is described in the right column of this blog. I hope to see you there!

    Tuesday, July 6, 2010

    Another Bargain Found!


    As I was passing through Michael's, I came across a set of ten A2 note cards with envelopes/pkg. in the $1 bins. I wanted to make some more of the cards Alice had shown us how to make (see yesterday's post HERE) so I could finally give some away and keep the original. I was elated when these note cards called out my name (FIVE times in fact)! The envelopes are not that sturdy (I can replace those), but the note cards are of a nice quality. Oh, how I love a GREAT bargain like that! BTW - If you took my baby card class at MLO, you'll recognize the flower punch I used in this card. That punch was cut in half and used as the tuft of hair for the baby in our Sweet Pea card. (It was a punch I also found in the dollar bins!) Note: The center of the flowers was made with craft paint that comes with a fine tip. Alice's Hint: Try practicing on a scrap piece of paper first and let the paint dry completely before placing the card in an envelope...also...the "FRIEND TO FRIEND" sentiment was done on my computer and is not included in SU's Thoughts and Prayers set (which was used for the leaves and branches).