Happy Dancing

Happy Dancing
Showing posts with label Thanksgiving. Show all posts

Friday, December 8, 2017

PIN IT FRIDAY FAVS:
Purses and the
Very Best of Pinterest Pins

I saw a wonderful purse tutorial on Pinterst using the Envelope Punch Board and knew I had to make one for my dear sister in her favorite color: Any shade of blue!

Original Pin HERE

My purse turned out like this:


...and I made a matching card
to go with it:


I finished everything and realize that the purse really needed the bow that was shown in the original pin and video tutorial. Those finishing touches can made a BIG difference!


It helped me quite a bit to mark all areas ahead of time for the sticky tape placement using a pencil and to fold the velcro flaps before the purse was assembled. For my own future reference, here are the areas with adhesive tape:


I also increased the handles length to 10 1/2".

This purse started with a 12" x 12" piece of DSP and resulted in a final purse size of 4 1/2" wide x 6 1/2" high without the handles. With the handles, it was 8 1/4" high. That resulted in a large purse for any gift-giving occasion!

Next, I made a small version from a 9" square of DSP punched at 1 7/8" to hold a candy treat:


Here are a few more purse pins that caught my eye:

Original Pin HERE

Original Pin HERE

Original Pin HERE

...and finally...some handcrafted Thanksgiving cards
from friends who made me do a
happy dance:


Friday, August 18, 2017

PIN IT FRIDAY FAVS:
Double Z Fold Cards
and the Very Best of Pinterest Pins

Check out this lovely 3D double Z card by Dawn’s Stampin’ Thoughts:


Dawn's directions, video tutorial and measurements can be found HERE.

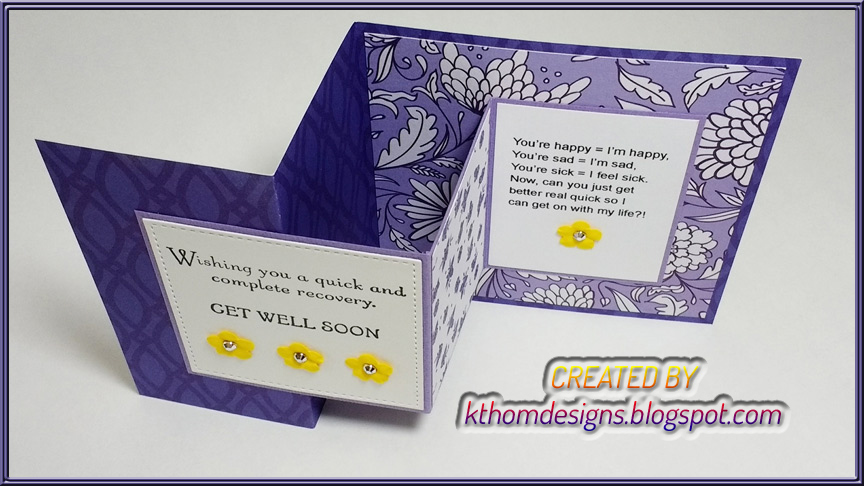
I created several versions and these were my two favs:


I simplified the layers for quick assembly. Here are my modifications for my second card shown above:

Background Z Fold Layer with Vertical Stripes:
  Along the 8 1/2" side of 8 1/2' x 11" piece of DSP medium weight:
  * Cut at 4 1/4″ to create 2 pieces that are 4 1/4″ x 11″
  * Left piece, score at 2 3/4" and 5 1/2" along the 11" side
  * Right piece: Save for a 2nd card
White Z Fold Layer Attached to Background Layer:
  * Cut white cardstock at 3 1/2″ x 8 1/2″, score at 4 1/4" x 2 1/8“ along the 8 1/2″ side
Floral Designer Paper:
* Cut at 4″ x 3 1/4″
* Cut 2 at 1 7/8″ x  3 1/2″
Sentiment Panels:
* Cut white cardstock at 3 3/8″x 2 5/8″ and 1 7/8“ x 1 3/4“


After I finished making this double Z version, I saw a square version on Pinterest by Jeanie Stark:
I like this version because when it's opened, the two layers are perfectly parallel and that appeals to my sense of balance! The first version at the top of this post does not have parallel insides like this card:
For measurements and instructions, click HERE.
These instructions make a 4 1/4" square double Z card. I made this square version plus I modified the design to make another one that was the traditional 4 1/4" x 5 1/2" version. Here are the results:
SQUARE VERSION


TRADITIONAL A2 SIZE VERSION 

Left side sentiment:
SU Thoughts and Prayers
The right side sentiment was done on my computer and modified from a sentiment I saw on Pinterest:
You’re happy = I’m happy,
You’re sad = I’m sad,
You’re sick = I feel sick.
Now, can you just get
better real quick so I
can get on with my life?!


SIZE COMPARISON OF BOTH VERSIONS

MY DOUBLE Z CARDS:

A Large Version


6” wide by 5” finished card size

Base = 5” x 12”, scored along 12” at 3” and 6”

Inside Z = 3.5” x 9”, scored along 9” at 4” and 6.5”

Third piece under Z piece on right side of base = 3 3/8” wide x 4 1/4”

Glue the third piece behind the far right panel of the inside Z piece then watch the video https://tinyurl.com/doublezcard at the 8 minute mark to see one way to glue a Double Z card together.


For a Small Version (that fits into A2 envelope):


Base = 8 ½” x 5.5” scored along 8.5” at 2 1/8” and 4 1/4”


Far right panel: 4” x 5 ¼” coordinating DSP


Skip to “Inside Z” below if using double-sided paper


Far left panel DSP: 1 7/8” w x 5 1/4” h (Width and height noted in case the paper’s pattern orientation makes a difference. The first cut will be the width with the paper pattern going in the correct direction.) *Cut 2 pieces if you wish to put paper on inside panel - see arrow above


For right panel DSP: 4” w x 5 1/4” h 


Inside Z = 3 7/8" x 7”, scored along 7” at 2 1/2” x 4 3/4”


White card stock for sentiment: 2 1/4“ x 3 5/8”


For remaining panels of DSP: Cut two at 2” w x 3 5/8” h


Note: Adding a piece of 4” x 5 ¼” coordinating DSP on the far right panel of the base adds a nice effect when the card is closed. Paste this piece first before adding the Z.


These double Z cards are so much fun to make and the photos don't do them justice compared to when you see them in person. Give them a try! Here are a few more double Z variations to make you smile:

For Original Pin, Click HERE
For more examples of double z cards, check out this gallery of Pinterest pins for all occasions HERE.

Friday, November 25, 2016

PIN IT FRIDAY FAVS:
Paper Divas
and the Very Best of
Pinterest Pins

I'm so lucky to be in a group of talented paper crafters and we call ourselves the Paper Divas. I hosted our last meeting and here are some of the items we created and shared:


The inside of my card was the result of
this Pinterest pin:

Original Pin HERE


I made a Pilgrim version like this for each person 
and put it at their place setting for a good laugh!
I got the idea from this pin:

Original Pin HERE 

Katie taught us how to make these lovely
card boxes that held 4 cards with envelopes:


This is the SU embossing set for the outside flap:


The flap closes thanks to a little
circle of Velcro that Katie brought
on Amazon.com.

She even made a template for each of us!!


...and here were her 4 cards inside the box:


Using SU products, Katie made these two
cute Christmas cards, too:


Alice Brown let us make this stunning card:


This was a Starbucks gift card favor I had
at each person's work area:


These holders were so much fun to make thanks to
a pin that includes a fantastic how to video:

Original Pin HERE

...and here was the Taste of Home dish that we feasted upon.
I made the whole thing in my cast iron skillet, but a
a casserole dish works well, too:

Cornbread Taco Bake

TOTAL TIME: Prep: 20 min. Bake: 25 min.
MAKES: 6 servings


Ingredients

  • 1-1/2 pounds ground beef
  • 1 can (15-1/4 ounces) whole kernel corn, drained
  • 1 can (8 ounces) tomato sauce
  • 1/2 cup water
  • 1/2 cup chopped green pepper
  • 1 envelope taco seasoning
  • 1 package (8-1/2 ounces) corn bread/muffin mix*
  • 1 can (2.8 ounces) french-fried onions, divided
  • 1/3 cup shredded cheddar cheese
  • (I added 2 cloves of finely chopped garlic once the ground beef was browned.)
  • Directions

    1. In a large skillet, cook beef over medium heat until no longer pink; drain. Stir in the corn, tomato sauce, water, green pepper, garlic and taco seasoning. Spoon into a greased 2-qt. baking dish.
    2. Prepare corn bread mix according to package directions for corn bread. Stir in half of the onions. Spread over beef mixture. Bake, uncovered, at 400° for 20 minutes.
    3. Sprinkle with cheese and remaining onions. Bake 3-5 minutes longer or until cheese is melted and a toothpick inserted into corn bread layer comes out clean. 
  • *Try experimenting by adding various items to the cornbread mix such as olives, green chilies, etc.