Happy Dancing

Happy Dancing
Showing posts with label Martha Stewart. Show all posts

Friday, October 21, 2016

PIN IT FRIDAY FAVS:
My Halloween Card and the
Very Best of Pinterest Pins

I found this DSP with a metallic silver design and
when I sponged black ink around the edges,
it made the silver pop even more!


Inside Sentiment

Bat Punch = Martha Stewart
(Sentiments Done on My Computer)

...and here were the cards that gave me inspiration:

Original Pin HERE

Original Pin HERE

Check out this fall treat:

Original Pin HERE

I made them for a party, put them on a metallic tray and they were a big hit! So easy, too!


HAPPY HAUNTING!

Friday, February 5, 2016

PIN IT FRIDAY FAVS:
Happy Heart Day and the
Very Best of Pinterest Pins

I put my HOM MADE valentines into the mail this week and here are some of my favs:


Inside


Lower Border from Martha Stewart
Top Heart Die from SU: Bloomin' Heart Thinlet
Sentiment from SU: Bloomin' Love

Inside


Sentiment and Flowers:
Valentine Defined from SU

...and here are some of the very best 
Happy Heart Day pins
that inspired me:

Stampin' Up! Bloomin' Love Bundle - It's a WOW - with the How To Video, Gorgeous Valentines, Clean and Simple, DIY Greeting Cards, Kay Kalthoff, #stampingtoshare:
Original Pin HERE

The Craft Spa - Stampin' Up! UK independent demonstrator : Have a heart... a Bloomin' Heart...:
Original Pin HERE

Love these Vday card pins, too:

handmade Valentine card showcased on stampwithbrian.com .... by Jen Lane ... pink and red with a spot of white ... pretty card ... nice design layout ... Stampin' Up!:
Original Pin HERE

Love Blossoms With The Bloomin' Heart Thinlit Die. What a stunnung card!:
Original Pin HERE

CAS115 ECG by Biggan - Cards and Paper Crafts at Splitcoaststampers:
Original Pin HERE

Pink Paint Chip Card:
Original Pin HERE

...and this easy explosion inside insert
will surely make a special someone smile
for Valentine's Day or any occasion:

Just in time for Valentines Day, a super easy card to make and give! It explodes with love!...:
Original Pin HERE

Friday, May 8, 2015

PIN IT FRIDAY FAVS:
Sweet Summer and the
Very Best of Recent Pinterst Pins

I decided to go through some of my older and nearly forgotten stamp sets to make a few new cards. When I saw this card on Pinterst, I knew I had to use it for inspiration with my SWEET SUMMER SU set:

Original Pin HERE

 Version One

Inside View

 Version Two

Inside

Copics:

Border Punches by Martha Stewart

Bees by Jolee's

Check out a few more Sweet Summer cards HERE and check out all of the submissions for Paper Pal Arts 250 Color Challenge HERE....and wait...there's more...I made this Mother's Day card below for my dear MIL using inspiration from two card ideas I recently saw on Pinterest: 


Here are my inspirational pins:

Happy Friday, everyone. Sherry here with another monochromatic card featuring the Fairyland Butterflies. I will be teaching a monochromatic class at Ultimate Hobbies in May, date not yet set, and this card will be one of the ones we'll be creating. This die is beautiful just as it is, and you can also separate the butterflies, making it very versatile. I love when that happens! As you can see, this is quite a simple card. I once again used the Open Studio Rectangle Layers to create the framed pi
Original Pin HERE
and
the letterpress technique pin:
Original Pin HERE

The pin above will take you to a terrific tutorial showing two ways to letterpress using a Cuttlebug or other similar device....and then I saw a wonderful butterfly treat stand on Inkin' Idaho's blog:

Inking Idaho
Original Pin HERE

Inking Idaho: Butterfly Table
Original Pin HERE

 ...and I knew I had to make one to go with my butterfly Mother's Day card and my cupcake box (described in a previous post HERE):

,

I just realized that I have to add a row of pearls to the butterfly body.

..and lastly...one of my favorite humorists, Erma Bombeck, once said, "The hardest part of being a mother is having to show up for the job EVERY day!" To the amazing women in my life who are mothers, I'm wishing you a Happy Mother's Day! 

Friday, April 3, 2015

PIN IT FRIDAY FAVS:
The Very Best of Recent Pins on Pinterest

COLOR ON BLACK CARDS

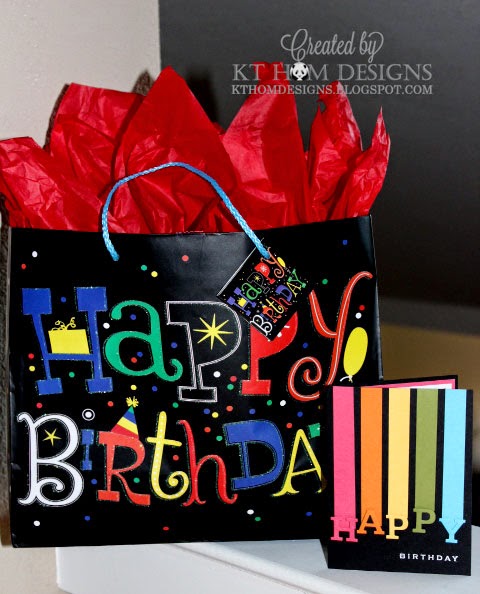
My talented friend and neighbor, Katie, came up with the wonderful design for this card below and I got to make one for my dear FIL's birthday last week --- PLUS I already had a matching bag in my stash of gift bags! Oh! I love when that happens!


I didn't have the die cut for the letters used to make HAPPY, but I did have a small butterfly punch, so I tried making a few similar cards like this:

SENTIMENT:
Elementary Elegance (SU)

The sentiments in white on the above cards are heat embossed and that - along with the colors on black - really makes these cards pop when seen in person! I recalled seeing other black and white cards on Pinterest recently and this one called out to me:

Darling card!
Original Pin HERE

I'll have to try cutting strips of black card stock to make one just like this, but I did have some black and white striped paper already and CASED this idea to make this card:

SENTIMENT:
Heard from the Heart (SU)
LEAVES Made with a
Martha Stewart Punch

Here's one last variation on cards using strips of color and butterflies. This is my next card to make using SU's small butterfly punch and their Papillon Potpourri set. I'll try it using a black card base, too!

butterfly card-stampin up
Original Pin HERE

Friday, March 20, 2015

PIN IT FRIDAY FAVS:
The Very Best of Recent Pins on Pinterest

Envelope Punch Board Easter Baskets
I needed a craft project to hold some Easter treats and here's what I created thanks to a few Pinterest pins and my envelope punch board:

A small and large version!

There is a 1/2" difference between the two sizes in all directions as shown in this picture below:


I used doilies from Martha Stewart. At first, I was folding them in half and using one per side, but then I made so many baskets that I had to cut the doilies in half so they'd last for all of the baskets I ended up making!...and here is the pin that started me on my journey to find measurements:

Original Pin HERE

The measurements and steps to make the small and large size baskets are listed at the very end of this post, and Linda Parker provides a terrific video tutorial with such a lovely accent at:
tinyurl.com/minibasket

I also made a few modifications to her instructions to make things easier and I also listed them with the instructions below....and here are the cards I made to go with these baskets after I saw this pin:

Just Sponge It: Butterfly Basics Birthday Card, Butterflies Thinlits Dies, Ornate Tag Topper Punch, birthday cards, DIY, Stampin' Up!
Original Pin HERE


INSIDE VIEW

I felt the card needed a little bit of a boost of color and interest so I added a border at the bottom:


Oops! I realized I left off a background element in the upper right corner!


I added it using Grape Jelly ink, but I like the color I used on my original card (shown right after the pin for this card above) where I used Crumb Cake!

INSIDE VIEW

Stamp Set: SU Butterfly Basics
Ink: SU Lucky Limeade and Crumb Cake,
Memento Grape Jelly and Basic Black
Copics: V17, 15, G29 and G24
Flower Center: Scribbles Bright Yellow
Dies: Rhone Butterfly Wings by Memory Box
and Nesties Labels Four

Large Basket:
1) Start with an 8" square piece of medium weight DSP
2) Place the upper left corner at the 2" point, punch and score
3) Repeat Step Two on the remaining the edges of the 8" square
4) Turn the paper over and repeat Steps Two and Three
5) Fold along all score lines with a bone folder
6) Make two cuts up to the first score line as shown in the video
7) Make the same two cuts on the opposite side
8) On the right and left sides where cuts were not made, score across the flap as shown in the video (NOTE: This step is not necessary with the small basket size as the flaps can be folded over without the score and speeds the process along if you are making multiples!)
9) On the flaps where cuts were made, fold the right and left flap over and secure with glue or a glue dot, then bring the middle flap up and mark with a pencil where the score line needs to be made to bring the flap up and over.
10) Cut a handle 1" x 8.5" out of the same or coordinated DSP and attach with glue dots to the inside of the basket AFTER embellishments - such as doilies - are applied.

Small Basket:
1) Start with a 6" square of medium weight DSP
2) Place the upper left corner at the 1.5" point, punch and score
3) Proceed with Steps Three through Nine listed above
4) Cut a handle 1" x 11.5" and follow direction in Step 10 above

OTHER MODIFICATIONS:

I like to cut off the right and left flaps (on the no cut flap sides) as it gives a nice clean look to the finished basket:


 3D Embellishments on the handle from K&Co.

I also used this technique to mark the score lines for the flaps in the center: