Happy Dancing

Happy Dancing

Friday, May 22, 2015

PIN IT FRIDAY FAVS:
White Embossing and the
Very Best of Recent Pins

I saw an idea on Pinterest that caught my eye using a flower stamp, Versamark clear ink and white embossing powder:

Mask. Stamp a couple of images in VersaMark on white cardstock & heat emboss in clear. Sponge. Then stamp the same image in different colors over the sponging.
Original Pin HERE

I was drawn to the simplicity and lots of white space on this card....so I gave it a try:


STAMP SETS by SU:
Itty Bitty Backgrounds
Messages for Mom
Silhouette Sentiments
Wonderful Words
Yummy

I was just about to give this card away,
turned it over to put my HOMMARK CARD
sticker on the back...and when I turned it back
over, there was a hot pink smudge in the
white space! YIKES!...so adding a few flowers
in the white space let me fix it in a hurry!


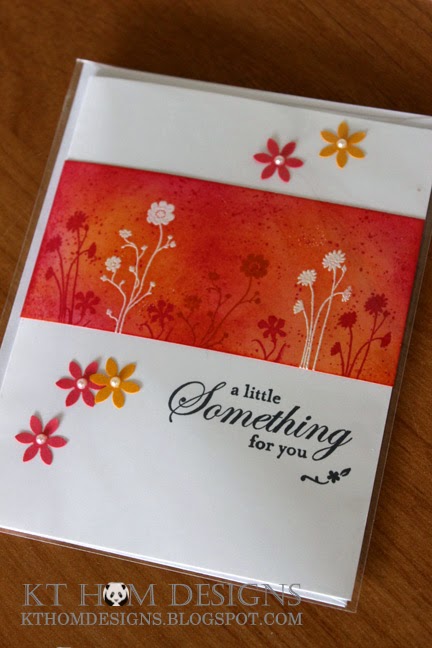
How to make this card: Cut a 2" x 4 1/4" rectangle and do all of the stamping, embossing and sponging on that piece of white card stock before adhering it to the front of an A2 card. Those Itty Bitty Background dots added that final finishing touch! Be sure to wipe off any ink on the white embossed images with Kleenex because it will rub off onto your hands, the card base and the envelope!

Here are a few more white embossed pins:

By KatarinaM at Splitcoaststampers. Stamp foliage in VersaMark and emboss in white. Sponge distress inks for background. Layer, layer, layer!  Stamp from "Serene Silhouettes."
Original Pin HERE

Lovely As A Tree by Stampin Up. I really love, love, love this card. It's not hard to make either. For instructions on how to make it go to http://thescrappingqueen.blogspot.com/2014/11/samping-on-vellum.html
Original Pin HERE

handmade card ... monochromatic Calypso Coral ... clear embossed the flower on white ... sponged on color ... stamped one big flower on top ... lovely ... Stampin' Up!
Original Pin HERE

. Flower Shop pansies embossed in white on vellum and punched out with pansy punch.
Original Pin HERE

Friday, May 15, 2015

PIN IT FRIDAY FAVS:
The Very Best of Recent Pins on Pinterest

Multi-Faceted Boxes

I love this wonderful gift box idea that appeared on Pinterest thanks to a talented paper crafter named Pootles:

Faceted Gift Box Tutorial using Stampin' Up! Everything Eleanor Closed
Original Pin HERE

She has a terrific video on her blog HERE, and the measurements posted on her blog with a pic from her video showing where to make your cuts are as follows:

Start with a medium weight card stock: 11 1/2 x 7 7/8″ 
Score on the SHORT (7 7/8") side first at 2 1/2, 4 5/8, 7 1/8″ 
Bring the narrowest horizontal line to the top and score to the SECOND score line (as per the video) at 2 1/2, 5,  7 1/2, 10″ 
ROTATE 180 degrees and score to the FIRST score line (as per video) at 1/4, 2 3/4, 5 1/4, 7 3/4, 10 1/4″ 


I also used tinyurl.com to make an easy url to remember for this project: tinyurl.com/pootlesbox. Another crafty SU demonstrator named Frenchie featured Pootles box this week and posted pics of the boxes she made:


This is my version:


I decided to switch out the gold flower on top
with a flower I made from the same paper:


HINT: I glued my flower to the lid so
the brad doesn't show when the
lid is lifted open.

The die used to make the rose on the lid is from
My Favorite Things and can be found HERE

My version of where to cut is shown below:

(HINT: Use red sticky tape on the half triangle
tab to ensure that the box will not come apart!)

I realized that my version is the mirror image of the
one Pootles showed in her video as shown below.
The difference is whether you're viewing the
inside vs. the print side of the paper!


Yet another project that I can't stop making...and
it looks so much more impressive IRL (in real life)!

One more box today for me with a hybrid flower:


People will not believe that you made this box! (I have proof of this fact!) It's perfect for Father's Day gift giving!

Friday, May 8, 2015

PIN IT FRIDAY FAVS:
Sweet Summer and the
Very Best of Recent Pinterst Pins

I decided to go through some of my older and nearly forgotten stamp sets to make a few new cards. When I saw this card on Pinterst, I knew I had to use it for inspiration with my SWEET SUMMER SU set:

Original Pin HERE

 Version One

Inside View

 Version Two

Inside

Copics:

Border Punches by Martha Stewart

Bees by Jolee's

Check out a few more Sweet Summer cards HERE and check out all of the submissions for Paper Pal Arts 250 Color Challenge HERE....and wait...there's more...I made this Mother's Day card below for my dear MIL using inspiration from two card ideas I recently saw on Pinterest: 


Here are my inspirational pins:

Happy Friday, everyone. Sherry here with another monochromatic card featuring the Fairyland Butterflies. I will be teaching a monochromatic class at Ultimate Hobbies in May, date not yet set, and this card will be one of the ones we'll be creating. This die is beautiful just as it is, and you can also separate the butterflies, making it very versatile. I love when that happens! As you can see, this is quite a simple card. I once again used the Open Studio Rectangle Layers to create the framed pi
Original Pin HERE
and
the letterpress technique pin:
Original Pin HERE

The pin above will take you to a terrific tutorial showing two ways to letterpress using a Cuttlebug or other similar device....and then I saw a wonderful butterfly treat stand on Inkin' Idaho's blog:

Inking Idaho
Original Pin HERE

Inking Idaho: Butterfly Table
Original Pin HERE

 ...and I knew I had to make one to go with my butterfly Mother's Day card and my cupcake box (described in a previous post HERE):

,

I just realized that I have to add a row of pearls to the butterfly body.

..and lastly...one of my favorite humorists, Erma Bombeck, once said, "The hardest part of being a mother is having to show up for the job EVERY day!" To the amazing women in my life who are mothers, I'm wishing you a Happy Mother's Day! 

Friday, May 1, 2015

PIN IT FRIDAY FAVS:
The Very Best of Recent Pins on Pinterest

SCREEN CARDS
My talented friend, Mel, introduced me to screen cards and I can hardly stop making them! Here's the first one I made:


She gave a great tip on how to get that bottom punch to line perfectly up when all four panels are closed: Punch the first panel right in the center at the bottom, then close only the next panel underneath the top panel and line up the punch so it matches the punched out area on that first panel. Keep adding the next panel and the panel before on top until all four panels are punched out.

My next screen card was with a set I haven't used in a long time called Sweet Summer (SU retired):


Bees from Jolee's at Michael's (LOVE those bees!)

On the card above, I tried fussy cutting around the larger flowers on panels two and four...but on the next one I made, I used punches on all of the flowers. The large flower is from a 1" punch and the smaller flower uses a 3/4" punch:

STAMPS:
Sweet Summer and Messages for Mom by SU

I used my Copic markers for the coloring and used the broad tip end to color on white paper, then stamped HAPPY and cut it out with SU's small oval punch to get a perfect color match for the flowers and ovals:


Then I also tried a few screen cards using a purple palette:

STAMPS:
Sweet Summer, Fabulous Phrases and A Word for You by SU

There are loads of screen cards and tutorials on Pinterest....Check them out HERE and HERE. Also, there are two ways to fold up these screen cards and then open them up to display. If you fold them like the photo above, one will see a decorated panel right away when the envelope is opened and the card is removed. However, if you fold them like the second photo in this post, the panels display so nicely IMHO. Which way do you prefer? Make a few of these cards and you'll be addicted to making them, too!