Happy Dancing

Happy Dancing
Showing posts with label for G and G. Show all posts

Friday, May 15, 2015

PIN IT FRIDAY FAVS:
The Very Best of Recent Pins on Pinterest

Multi-Faceted Boxes

I love this wonderful gift box idea that appeared on Pinterest thanks to a talented paper crafter named Pootles:

Faceted Gift Box Tutorial using Stampin' Up! Everything Eleanor Closed
Original Pin HERE

She has a terrific video on her blog HERE, and the measurements posted on her blog with a pic from her video showing where to make your cuts are as follows:

Start with a medium weight card stock: 11 1/2 x 7 7/8″ 
Score on the SHORT (7 7/8") side first at 2 1/2, 4 5/8, 7 1/8″ 
Bring the narrowest horizontal line to the top and score to the SECOND score line (as per the video) at 2 1/2, 5,  7 1/2, 10″ 
ROTATE 180 degrees and score to the FIRST score line (as per video) at 1/4, 2 3/4, 5 1/4, 7 3/4, 10 1/4″ 


I also used tinyurl.com to make an easy url to remember for this project: tinyurl.com/pootlesbox. Another crafty SU demonstrator named Frenchie featured Pootles box this week and posted pics of the boxes she made:


This is my version:


I decided to switch out the gold flower on top
with a flower I made from the same paper:


HINT: I glued my flower to the lid so
the brad doesn't show when the
lid is lifted open.

The die used to make the rose on the lid is from
My Favorite Things and can be found HERE

My version of where to cut is shown below:

(HINT: Use red sticky tape on the half triangle
tab to ensure that the box will not come apart!)

I realized that my version is the mirror image of the
one Pootles showed in her video as shown below.
The difference is whether you're viewing the
inside vs. the print side of the paper!


Yet another project that I can't stop making...and
it looks so much more impressive IRL (in real life)!

One more box today for me with a hybrid flower:


People will not believe that you made this box! (I have proof of this fact!) It's perfect for Father's Day gift giving!

Friday, April 3, 2015

PIN IT FRIDAY FAVS:
The Very Best of Recent Pins on Pinterest

COLOR ON BLACK CARDS

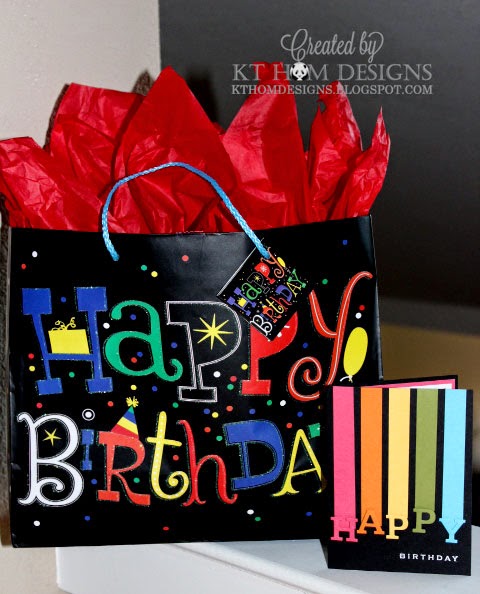
My talented friend and neighbor, Katie, came up with the wonderful design for this card below and I got to make one for my dear FIL's birthday last week --- PLUS I already had a matching bag in my stash of gift bags! Oh! I love when that happens!


I didn't have the die cut for the letters used to make HAPPY, but I did have a small butterfly punch, so I tried making a few similar cards like this:

SENTIMENT:
Elementary Elegance (SU)

The sentiments in white on the above cards are heat embossed and that - along with the colors on black - really makes these cards pop when seen in person! I recalled seeing other black and white cards on Pinterest recently and this one called out to me:

Darling card!
Original Pin HERE

I'll have to try cutting strips of black card stock to make one just like this, but I did have some black and white striped paper already and CASED this idea to make this card:

SENTIMENT:
Heard from the Heart (SU)
LEAVES Made with a
Martha Stewart Punch

Here's one last variation on cards using strips of color and butterflies. This is my next card to make using SU's small butterfly punch and their Papillon Potpourri set. I'll try it using a black card base, too!

butterfly card-stampin up
Original Pin HERE

Friday, May 9, 2014

PIN FRIDAY FAVS:
Last Post for Card in a Box

In a previous PIN IT FRIDAY FAVS post, I featured CARD IN A BOX projects. This past weekend, I finally had a chance to make up several of them for Mother's Day, a birthday and a get well card. Here's what I made and I have to say...WARNING!! Making these boxes can be addicting!


Back View


Jolee's bee stickers and their BLING flowers made the construction of this box go a lot quicker. The flowers have adhesive on the back and after I attached them to my handmade stems, I used face powder applied to the backs of the flowers which instantly takes away the stickiness! (The adhesive has to be removed so that the flowers don't stick to the back flap when it's collapse and placed in an envelope.)


My original post with instructions can be found HERE, but the basic measurements are as follows:

One 5.5" x 8.5" piece of  DSP:
Along the 5.5" side score at 2 3/4"
and
along the 8.5 side score at
1/2", 2.5", 4.5" and 6.5"
OR
2", 4", 6" and 8"
(Depending on the amount of the design
 desired for the back panel,
you may want to start your
scoring with 1/2 " or 2")

 ...and the nicest thing about this version --- these boxes collapse and fit into a standard A2 envelope!

I did make a modification to the instructions:  For the 3 flaps that open on the sides - NOT the very back flap - I trimmed those 3 flaps so they all measured 2" square as shown below so the base of the box can be seen better and I also liked the scale of them compared to the base and back panel:


Here are a few more pics I took to show how the center 3" pieces are inserted. I used 1/2" red sticky tape on the 1/2" flaps and I placed the 3" pieces about a 1/4" into the box so they wouldn't show as much:


I also made up an insert with a picture to include with the card that tells the recipient how to set up their box after they take the card out of the envelope. It says:

This is a card in a box!
Open it up and bend it to the
left to form a perfectly square
box with the three smaller
flaps extending out.

....and look at this beautiful creation from Pinterest:

POP-UP BOX BIRTHDAY CARD (3 IMAGES) by: carolynshellard
Click HERE for the Original Pin

Sunday, March 23, 2014

LATEST CARDS

My pen pal, Leslie-Ann, in British Columbia has made me do my happy dance several times over the last few days thanks to not one BUT TWO of her amazing cards!! Thank you for making me smile BIG TIME, LA!


First, came this gorgeous card and everything about it is WONDERFUL! I love the saying and it's going into a frame to put in my office =) Leslie-Ann told me that the embossed background paper was handmade and it truly adds to the richness of this magnificent card....and for her second card, she included the measurements inside the card on the right panel so I could try making one, too! What a terrific pen pal she is! 


So clever how the butterfly is suspended in the opening!

Now here are some cards I made this week...first up is a birthday card for my dear father-in-law who will turn 88 years young this week! For the inside right panel, I cut out a picture of the three grandsons taken 15 years ago...my how time flies!


Then I made this baby chick card for our friends who just became first-time grandparents:


...and lastly...I sold some items at a paper crafters' flea market recently and was able to buy some new toys from the profits. This butterfly die made me do my happy dance again!


Inside view showing an oval embossing folder from SU along with a stamp set from My Favorite Things called Punch a Bunch (retired but can be found on ebay)...plus here's version two:


The die is from Memory Box and called Kensington Border and the background embossing folder is from Darice that I found months ago at Hobby Lobby:

product image


I was having a problem getting this intricate die to cut out properly even with the waxed paper technique, but then I made a YUREKA! discovery: If I made a sandwich of an A plate, C plate, glossy photo with the glossy side facing up, then the card stock I wanted to cut...and finally...the die face down with a B plate on top...it cut out all of the pieces beautifully when sent through my Cuttlebug!

Monday, March 3, 2014

CUPCAKES IN A JAR, ETC.

This was the favor from our newest neighbor's first birthday party! Her mother said she found them on Etsy HERE and they look like a wonderful favor we crafty types could make ourselves..but sometimes...you have more money than time! (The adaptation of this idea for all sorts of occasions is ENDLESS --- Happy dance in progress!)


...and this was the card I made to go with the book we gave to this wonderful one-year-old:


Some other projects I've just completed include some birthday cards using the BIRTHDAY BAKERY and CREATE A CUPCAKE sets from Stampin' UP. Once I completed the coloring with Copic markers, I added some Crystal STICKLES to give the card some bling!


...and here's a pink version:


SU's WORD WINDOW PUNCH was used to create the awning. I attached each alternating colored piece of the awning to the center of a 3/4" x 4 1/4" strip of card stock that was covered with a piece of 1/2" sticky tape down the entire 4 1/4" length. After attaching all 11 strips, I scored the entire awning 1/4" from the top and 1/4" from the bottom. I secured the top of the awning to the card with a strip of 1/8" red sticky tape and trimmed the far right side of the card so that I got 11 full segments of the awning across the top.

...and my WONDERFUL pen pal and talented card maker, Leslie-Ann in British Columbia, also asked me to provide some directions for a card I posted recently. She wanted to know how to make the Kleenex box found on the inside of this card, so here goes:


NOTE: The bottom lattice piece on the inside of the card was made with a Martha Stewart punch.

To make the pop-up Kleenex box, start with a 6" x 3" piece of medium weight card stock. Score along the 6" side at 1.5", 3" and 4.5". Then use a die to cut the oval in the center of the 2nd panel. I used the 2nd smallest die from Spellbinders' Small Classic Scallop Ovals set.


To make the Kleenex panel to put through the hole, I cut a full-size tissue in half and then cut each half in half again. I took a quarter piece and placed it as shown below:


Then I folded it in half so that two mountain peaks are created at the top:


(This technique also works well when adding several pieces of tissue paper into a gift bag - but you would use a full sheet of tissue paper and add 4 or more sheets folded as shown here and in the next step before placing them into the bag.)

Now gather up the Kleenex at the bottom:


Put the Kleenex through the hole and checked on the outside or RIGHT side to see how you want to arrange the tissue. Once you're happy with the way the Kleenex is coming out of the box...


...tape the end of the Kleenex to the third panel on the INSIDE of your box. NOTE: Be sure to place the tape BELOW the score line:


Now add red sticky tape on the RIGHT side - or the design side - of your card stock on the first and last panel as shown:


Finally, remove the sticky tape backing, fold the card stock in half with the sticky tape facing out and the tissue on top. Open up your card to the inside, center the closed tissue box inside the card just ever so slightly off of the center fold of your card base, close your card down and press to adhere the box to the front and back panel of your card. When you open the card back up, viola...you have a Kleenex box that pops up!