Happy Dancing

Happy Dancing
Showing posts with label ribbon. Show all posts

Friday, March 24, 2017

PIN IT FRIDAY FAVS:
SAB Stampin' Up and the
Very Best of Pinterest Pins

I finally had time to make up some thank you cards using my new Avant-Garden set from SU:


There were many pins to use for inspiration and these were the first cards I made with this set:


Inside View of Left Panel


When I was all done with the card above, I flipped it over to add my HOMMARK sticker on the back and the card touched the green ink pad by the green arrow - ARG!...so I had to turn this accident into a chance to use some creativity to cover it! An extra leaf would have thrown off the balance, but you can see what I ended up doing below. I was VERY happy how it all turned out!


The cut out flower gave the card an added embellishment!

...and one last card made:

  
Now here are the pins for this set:

Original Pin HERE

Original Pin HERE

Friday, October 14, 2016

PIN IT FRIDAY FAVS:
Cards from My Pen Pal
and the Very Best of Pinterest Pins

My pen pal, Leslie-Ann, in BC, Canada has been the source of multiple happy dances lately thanks to the lovely cards she creates and sends my way! Here are some of her most recent pieces of art:


Leslie-Ann sent me these pics of products used:

She put this die on the inside of the card.


This is the purrrrfect card for my cat-loving friends!

Here are some more cat cards on Pinterest:

Pinterest Pin HERE


Pinterest Pin HERE

Pinterest Pin HERE

Pinterest Pin HERE

Pinterest Pin HERE

Friday, June 10, 2016

PIN IT FRIDAY FAVS:
Tiny Boxes and the
Very Best of Pinterest Pins

I saw a wonderful tiny box idea on Pinterest that includes a tutorial:

Stampin’ Up! Demonstrator stampwithpeg – Cute little treat box using New In Colors paired with old favourites. I love the new 2016 – 2018 In Colors and wanted to see how they mixed in with…:
Original Pin HERE

These boxes are 1 1/4" high and wide - just the right size to hold a small chocolate treat. First, I made the box following the terrific instructions and photos with measurements on the Stamp with Peg website HERE. Then I modified the measurements and made another box that was 2 3/8" high and wide. Here are my two versions:


The larger box holds two Hershey's Miniatures side-by-side.  Follow these measurements:

Card Stock: 5 5/8" x 3 1/8"

Along the 5 5/8" side, score at:
2 1/8", 2 5/8", 4 3/4" and 5 1/4"

Along the 3 1/8" side, score at:
1/2", 2 3/8, and 2 7/8"

Fold and cut as shown per Stamp with Peg's blog:


Cover miniatures with coordinating paper:
3" x 1 1/2"

For more box and favor ideas, check out these Pinterest pins that can be modified for any gift-giving occasions:

Card with gift box:
Original Pin HERE

Stampin' Up! UK Demonstrator Laura Mackie:
Original Pin HERE

Flowery 5-Card All-Occasion Card Box Gift Set:
Original Pin HERE

Stampin' Up! Global Artisan Design Team Blog Hop I Helping Me Grow watercolour notecard set:
Original Pin HERE

Here's my version:


...and card inside:

Friday, January 1, 2016

PIN IT FRIDAY FAVS
and the Very Best of 2015 Pins

HAPPY NEW YEAR!


Statcounter.com lists my most popular 2015 Pinterest pins for this site and I thought you'd enjoy seeing them...so here goes:

Embossing Folder Goodness:
fs222: by MyPrecious - Cards and Paper Crafts at Splitcoaststampers:
Original Pin HERE

A Triple Stamped Card:
Love this technique - go watch video.:
Original Pin HERE

Now for a brilliant tutorial to get a full sheet of embossed paper when the folder is too short to catch all of the paper:

Brilliant Tutorial to get a full sheet of embossed paper when the folder is too short to catch all of the paper!:
Original Pin HERE

Here's a simple gift wrapping idea that could be used for Valentine's Day coming up:

Cute package:
Original Pin HERE

...and lastly...check out this frequently pinned idea for your Christmas cards next year:


Alex's Creative Corner: Cardinal Punch Art:
Original Pin HERE

This Christmas, I received the card below from one of my very talented card maker friends using a modification of this SU bird punch cardinal:


Click HERE for a card I made in 2014 using this same cardinal idea along with my favorite 2014 Christmas card ideas.

Friday, September 26, 2014

PIN IT FRIDAY FAVS:
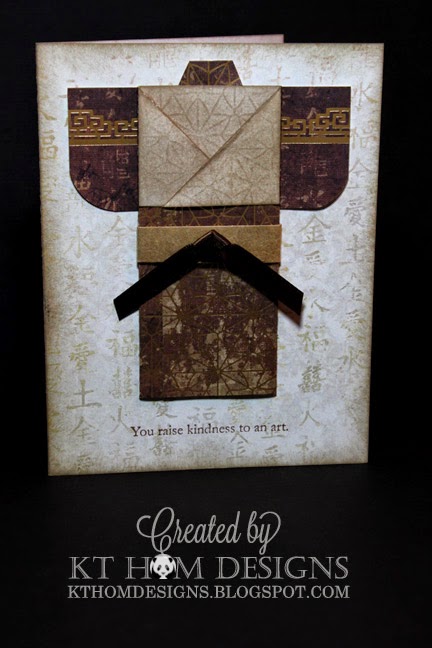
Kimono Cards

I saw this kimono book mark last week at the Sunnyvale Senior Center craft store when I stopped by to visit my friend Alice. It called out my name and I had to buy it!


I thought a much smaller version would make a great card front and here is the result:

Sentiment: SU's Vintage Vogue

...but it seemed that something was missing, and that something was a collar!...so I added that:


While I had everything out, I wanted to make another one...but when I stamped the saying on the second one, it was at a slight angle...so...I chopped off the card front and cut all four sides to align the saying parallel to the bottom edge then matted it on a larger 5"x7" card. I liked the result even better than the first card! Don't you love it when a mistake turns into a happy little opportunity?! 


Back sleeve piece: 3/4" x 1 1/2"
Obi: 3/4" x 1" scored at 1/4" along long side
then folded into the center to
form a final 3/4" x 1/2" obi
Front piece: 5" x 4"
(Fold the left side of the 5" piece to a 1 1/2" point marked
from the right edge and use a bone folder...then fold the
right side over leaving about 1/4" or so from the left-side fold.
The left lapel needs to be trimmed to align it with
the right lapel.)

I sponged Crumb Cake ink on the white side of the paper and to my surprise - the design of the pattern side showed through! (The sponging was done on the lapel and neck areas of the kimono.)

This was the wonderful paper pack I found at Joann's for my Asian papers - half of them with beautiful foiled designs on them:


I also found a video tutorial on Pinterest to make another type of kimono for a card front:

CLICK HERE FOR THE ORIGINAL PIN
and view the tutorial.

I made one using the measurements from the video, but I found it too small when it was finished, so I extended the paper measurements to 3" x 10" - making the second fold in the video at 1-3/4" instead of 1" as stated in the video. Here is the card I made from this video tutorial:


The down side is that is a little bulky to send in the mail...so this will probably be a hand-delivered type of card!  Here are a few other Asian cards I found during my Pinterest searches:

LSC213 Kimono jhg 3_27
CLICK HERE FOR ORIGINAL PIN

Using punches instead of a stamped image for the Asian girl, this card would be a nice one to create: 

Kimono
CLICK HERE FOR THE ORIGINAL PIN

Love this kimono idea as well as the papers used:

Kimono card for Chinese Theme Card Swap
CLICK HERE FOR THE ORIGINAL PIN

The card below uses a SU set called Easter Blooms. This flower pot card could be used for a number of different occasions such as a birthday, get well or sympathy:

Click HERE for the Original Pin

...and this last pin combines fancy and fashion!
Wisteria maiden kimono card - so pretty
CLICK HERE FOR ORIGINAL PIN

Friday, August 8, 2014

PIN IT FRIDAY FAVS:
For the Week Ending 8/8/2014

Stamp & Scrap with Frenchie: Pop-Up card video

This card was a recent highlight of my pinning activity on Pinterest! Learn how to make this easy pop up card by watching a terrific how-to video HERE (or at the end of this post) made by FRENCHIE STAMPS.

Collapsed and ready for mailing.

Side View

This cards fits into a standard A2 envelope and doesn't require extra postage. The video shows all of the steps so you can make one, too. Here's my version for my friend, Anne, who is turning 90 next month:


SU STAMP SETS:
Create a Cupcake
Sweet Little Sentiments
NESTIES:
Labels 3

This is the paper stack from JoAnn's that I used:

MEASUREMENTS:
Base = 11" x 4 1/4" 
Score at 1, 2 3/4, 3 3/4, 5 1/2, 7 1/4, 8 1/4 and 10"
Pop Up Tag Background = 2 3/4" x 5 1/4"
Pop Up Tag Top Layer = 2 1/2" x 5"

FRENCHIE'S VIDEO


MANY THANKS
to the OH! so
TALENTED FRENCHIE!

I also made up a pdf to create a set of four instruction cards that can be cut into quarters to place over the top of this collapsed pop up card in the envelope so that the receiver knows how to open and display their card. Click HERE to print on card stock, then cut it into four 4 1/4" x 5 1/2" pieces.