Happy Dancing

Happy Dancing
Showing posts with label Alice. Show all posts

Friday, December 8, 2017

PIN IT FRIDAY FAVS:
Purses and the
Very Best of Pinterest Pins

I saw a wonderful purse tutorial on Pinterst using the Envelope Punch Board and knew I had to make one for my dear sister in her favorite color: Any shade of blue!

Original Pin HERE

My purse turned out like this:


...and I made a matching card
to go with it:


I finished everything and realize that the purse really needed the bow that was shown in the original pin and video tutorial. Those finishing touches can made a BIG difference!


It helped me quite a bit to mark all areas ahead of time for the sticky tape placement using a pencil and to fold the velcro flaps before the purse was assembled. For my own future reference, here are the areas with adhesive tape:


I also increased the handles length to 10 1/2".

This purse started with a 12" x 12" piece of DSP and resulted in a final purse size of 4 1/2" wide x 6 1/2" high without the handles. With the handles, it was 8 1/4" high. That resulted in a large purse for any gift-giving occasion!

Next, I made a small version from a 9" square of DSP punched at 1 7/8" to hold a candy treat:


Here are a few more purse pins that caught my eye:

Original Pin HERE

Original Pin HERE

Original Pin HERE

...and finally...some handcrafted Thanksgiving cards
from friends who made me do a
happy dance:


Friday, September 29, 2017

PIN IT FRIDAY FAVS:
Fall is Here
and the Very Best of
Pinterest Pins

Creative juices are flowing and I've received a number of cards this month from my card making buddies. I usually don't post the cards I receive, but from now on, I want to share the multi talents of these terrific friends with the readers of this little 'ole blog! It's a wonderful thing to be on the receiving end of so much sunshine and happiness that these lovely cards bring into my life, and I only hope that the cards I send out elicit a similar feeling  ^_^  Here are the most recent cards received:


Rina used the embossing folder set by Anna Griffin seen HERE on Amazon and shown below: 


Then she gifted me the entire set! Oh! happy day! I found this card on Pinterest and CASED it for a thank you card for Rina:

Original Pin HERE

My CASED version:

I've stayed up until 2 AM playing with all of the sayings and embossing folders that comes in this set - Time truly flies when you're having creative fun! (More posts using these folders to follow for sure!)

Then, I received the loveliest of cards from a thoughtful and creative friend:


I love the effect of this multi-layered card! I also loved the label that Juliette places on the back of her cards:


Next, my awesome pen pal and paper crafter extraordinaire in British Columbia, Canada made this card for me:


I LOVE butterfly cards and I love how she used vellum for the layer under the butterfly's wings. Check out my butterfly card board on Pinterest HERE.

Lastly, another oh! so beautiful card from my multi-talented friend, Alice, that made me smile from ear-to-ear:

Friday, August 18, 2017

PIN IT FRIDAY FAVS:
Double Z Fold Cards
and the Very Best of Pinterest Pins

Check out this lovely 3D double Z card by Dawn’s Stampin’ Thoughts:


Dawn's directions, video tutorial and measurements can be found HERE.

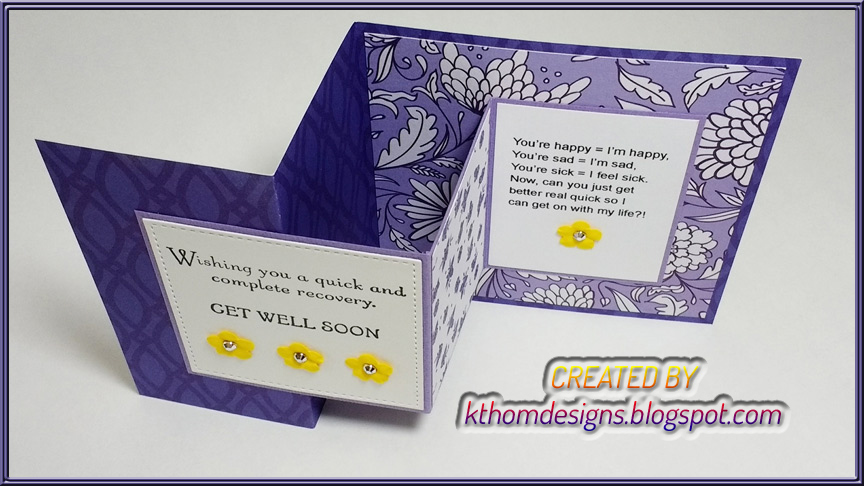
I created several versions and these were my two favs:


I simplified the layers for quick assembly. Here are my modifications for my second card shown above:

Background Z Fold Layer with Vertical Stripes:
  Along the 8 1/2" side of 8 1/2' x 11" piece of DSP medium weight:
  * Cut at 4 1/4″ to create 2 pieces that are 4 1/4″ x 11″
  * Left piece, score at 2 3/4" and 5 1/2" along the 11" side
  * Right piece: Save for a 2nd card
White Z Fold Layer Attached to Background Layer:
  * Cut white cardstock at 3 1/2″ x 8 1/2″, score at 4 1/4" x 2 1/8“ along the 8 1/2″ side
Floral Designer Paper:
* Cut at 4″ x 3 1/4″
* Cut 2 at 1 7/8″ x  3 1/2″
Sentiment Panels:
* Cut white cardstock at 3 3/8″x 2 5/8″ and 1 7/8“ x 1 3/4“


After I finished making this double Z version, I saw a square version on Pinterest by Jeanie Stark:
I like this version because when it's opened, the two layers are perfectly parallel and that appeals to my sense of balance! The first version at the top of this post does not have parallel insides like this card:
For measurements and instructions, click HERE.
These instructions make a 4 1/4" square double Z card. I made this square version plus I modified the design to make another one that was the traditional 4 1/4" x 5 1/2" version. Here are the results:
SQUARE VERSION


TRADITIONAL A2 SIZE VERSION 

Left side sentiment:
SU Thoughts and Prayers
The right side sentiment was done on my computer and modified from a sentiment I saw on Pinterest:
You’re happy = I’m happy,
You’re sad = I’m sad,
You’re sick = I feel sick.
Now, can you just get
better real quick so I
can get on with my life?!


SIZE COMPARISON OF BOTH VERSIONS

MY DOUBLE Z CARDS:

A Large Version


6” wide by 5” finished card size

Base = 5” x 12”, scored along 12” at 3” and 6”

Inside Z = 3.5” x 9”, scored along 9” at 4” and 6.5”

Third piece under Z piece on right side of base = 3 3/8” wide x 4 1/4”

Glue the third piece behind the far right panel of the inside Z piece then watch the video https://tinyurl.com/doublezcard at the 8 minute mark to see one way to glue a Double Z card together.


For a Small Version (that fits into A2 envelope):


Base = 8 ½” x 5.5” scored along 8.5” at 2 1/8” and 4 1/4”


Far right panel: 4” x 5 ¼” coordinating DSP


Skip to “Inside Z” below if using double-sided paper


Far left panel DSP: 1 7/8” w x 5 1/4” h (Width and height noted in case the paper’s pattern orientation makes a difference. The first cut will be the width with the paper pattern going in the correct direction.) *Cut 2 pieces if you wish to put paper on inside panel - see arrow above


For right panel DSP: 4” w x 5 1/4” h 


Inside Z = 3 7/8" x 7”, scored along 7” at 2 1/2” x 4 3/4”


White card stock for sentiment: 2 1/4“ x 3 5/8”


For remaining panels of DSP: Cut two at 2” w x 3 5/8” h


Note: Adding a piece of 4” x 5 ¼” coordinating DSP on the far right panel of the base adds a nice effect when the card is closed. Paste this piece first before adding the Z.


These double Z cards are so much fun to make and the photos don't do them justice compared to when you see them in person. Give them a try! Here are a few more double Z variations to make you smile:

For Original Pin, Click HERE
For more examples of double z cards, check out this gallery of Pinterest pins for all occasions HERE.

Friday, March 24, 2017

PIN IT FRIDAY FAVS:
SAB Stampin' Up and the
Very Best of Pinterest Pins

I finally had time to make up some thank you cards using my new Avant-Garden set from SU:


There were many pins to use for inspiration and these were the first cards I made with this set:


Inside View of Left Panel


When I was all done with the card above, I flipped it over to add my HOMMARK sticker on the back and the card touched the green ink pad by the green arrow - ARG!...so I had to turn this accident into a chance to use some creativity to cover it! An extra leaf would have thrown off the balance, but you can see what I ended up doing below. I was VERY happy how it all turned out!


The cut out flower gave the card an added embellishment!

...and one last card made:

  
Now here are the pins for this set:

Original Pin HERE

Original Pin HERE

Friday, September 16, 2016

PIN IT FRIDAY FAVS:
Garden Gate and the
Very Best of Pinterest Pins

I follow the Papertrey Inc. blog and discovered the release of this complete set of dies, stamps, printed sheets, stencils and a brass gate lock called GARDEN GATE and a video showing off the kit possibilities HERE:

Original Pin HERE

Original Pin HERE

You know how you see a card and then you immediately say to yourself: I MUST have this set?! That's what happened to me! Plus, my dear friend, Alice, was having a birthday and she loves all things flowers...so all the more reason I had to have it! 

It took a bit of practice to line up the stamps with each die cut, but here is my first card using this wonderful set:


Here's a thank you card I made:


There are loads of project ideas on the GARDEN GATE Make It Market Kit release page HERE. I can't wait to make more cards and tags with this kit (so I can justify my purchase)! For more pins related to this kit, click HERE.