Happy Dancing

Happy Dancing

Friday, January 30, 2015

PIN IT FRIDAY FAVS:
The Very Best of Recent Pinterest Pins

CARD CHICKS REUNITE!

The projects we made last week included a few modifications to Pinterest pins I recently added to my boards. The first was a simple EXTRA gum craft:


I purchased the gum packages from Costco and the decorative corner punch is by Martha Stewart. The base was created on my computer and the Chicks stamped the "SWEET" (from Michael's Dollar Bin) then added embellishments. It was fun to see all of their creativity as they were all different when completed ^_^

HERE is the Original Pin:

i think your EXTRA cool printable valentie's day tags...just add the gum

Then they made a simple tri-panel card (using Stampin' Up's banner punch) that can be modified to fit any occasion. The card folds up and fits into those standard envelopes sold in drugstores or dollar stores. (The actual box of envelopes is shown below in the last photo for this project):


INSIDE VIEW
Inside Sentiment: SU You Are Loved
Outside Sentiment: Michael's from Dollar Stamp Bin

MEASUREMENTS:
6" by 9 3/4" DSP
Along the 9 3/4" side,
score at 3 1/2" and 7" then use a 
decorative punch on the far right edge

 Here's a birthday card I made using the same idea:


...and a thank you note:


NOTE: You get 80 envelopes in one box!
TIP: Line the envelope with matching paper

For the third project, the Chicks made a simple embossing folder card using the SU Bird Builder Punch:


Outside Sentiment:
Express Yourself (SU)
Inside Sentitments:
You Are Loved (SU) and
Heard from the Heart (SU)

HERE is the original Pinterest pin:

I started out doing the one button CAS challenge but forgot the button LOL! DOH! So here is my Clean and Simple card that doesn't even have a button on it LOL  It's been ages since I uploaded something so hopefully this will be the first of many :-) **EDIT** Just want to add that this card was inspired by a card I recieved last Christmas from SCS's own Lydia :-)

The last project was the Valentine Kitten Treat:


The details were explained HERE in this previous post. Here are some final Card Chicks pics that made me smile:


Friday, January 23, 2015

PIN IT FRIDAY FAVS:
A Valentine Treat

NOTE: Starting in February, I'll be posting my PIN IT FRIDAY FAVS about two times a month ^_^ Sign up in the column to the right ("Follow by Email") to receive my future posts delivered via email.

Tonight is another meeting of my Card Chicks and one of our projects is cased from a Pinterest pin and the perfect project for our group of cat lovers: A cute kitten Valentine treat with two Hershey's Kisses inside!

Sweet  treat favor * Villa Kreativa: Ferrero Küsschen Verpackung mal anders
Original Pin HERE

There were no instructions included, so I created my own version and the measurements are below:


They needed a little something to really tie in the Valentine's Day theme, so I added a base using a Martha Stewart heart border punch and added a saying from SU's Teeny Tiny wishes:


Here are my measurements:

CAT:

2" x 7" piece of medium weight DSP

Along the 7" side score at 3" and 4"

(NOTE: If making a lot of these kittens, start with a piece of 7" x 12" card stock. Score along the 7" side at 3" and 4" then turn along the 12" side and cut every 2".)

BASE:

3" x 3" white card stock

Because I was going to make a zillion of these favors, I made a template for cutting the ears using a 2" x 3" piece of card stock, I placed a dot at 1" down and 1" across in the center. Then I drew a line from each corner to the dot and cut along the lines. 


  • Before folding each 2" x 7" piece of card stock, use the template to mark the cut lines for the kitten ears 
  • Add a small glue dot to the inside of each ear point and add a small piece of red sticky tape on the inside surface in the center of the base 
  • Use a 1/2" punch for two eyes and two parts for the mouth then adhere them to the front panel
  • Add a small glue dot where the mouth circles meet - slightly towards the top
  • Place three 3" pieces of twine or thinly cut pink card stock side-by-side on the glue dot
  • Place a small glue dot on the inside of a small heart and adhere it over the previous glue dot
  • Pull the whiskers to the top and bottom to spread them out
  • Using a 02 Micron black pen, add a set of dots under each set of whiskers
  • For the bow, cut off the bottom points on two small hearts and glue them to the ear by aligning the cut edges together then place a large adhesive pearl over the seam
  • Use a bone folder lightly along all fold lines
  • Hold two Hershey's Kisses or Hugs side-by-side and adhere them to the sticky tape 
  • Adhere the ears together via the small glue dots by carefully aligning front and back ears

NOTE: I used TomBow white glue for the eyes, mouth and bow hearts so that I could move them exactly into place once they were added to the kitten. Also, the glitter paper for the hearts really made these kittens pop!

I hope to make a lot of people smile when they receive these kittens with chocolate goodies inside!

Friday, January 16, 2015

PIN IT FRIDAY FAVS:
SU Butterfly Basics and Dies

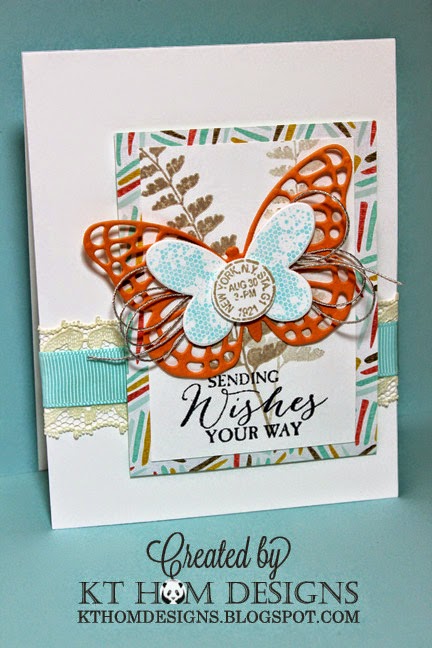
I just received my first Stampin' Up order in 2015 and had a chance to use my new Butterflies Basics set and the matching dies. From the talented Becky Roberts and her Inking Idaho blog, I cased her card and was so happy that I already had everything I needed! (Thanks for that same SU printed card stock, Mel)!

Original Pin HERE

...and my card:


The measurements for the accent rectangles are: Printed DSP = 3" x 4" and white card stock stamped layer = 2 1/2" x 3 5/8". I do like how Becky placed the ferns, so I will try another version leaving the entire top of the fern on the right visible on the stamped layer.

Thanks to a nice how-to video post by Patty Bennett on her Patty Stamps blog , I also learned a new way to get those intricate dies to release the paper in an efficient way using a dryer sheet! Here's the video:

Original Pin HERE

I still had to use my pointy tool to release the paper from the die itself BUT the paper butterfly released perfectly without any issues - completely intact and ready to use! The layers are as follows when using a die cut machine such as a Cuttlebug: Standard plate (A for Cuttlebugs), cutting plate (C), dryer sheet, paper to be cut, waxed paper, die and final (B) plate.

...and here's another butterfly project I made using my new toys:


(The box and matching raffia are from a new line of blank boxes that I recently found at Target that was on an end cap near their card area. The Happy Birthday Wishes saying is from SU's Simply Sketched set.)

....and here's my birthday card to match:


While I had the large oval punch out, I made this thank you note for my boss and his wife from a vintage picture I found over the holidays when I was reorganizing my picture boxes:


I cased that card idea from my talented friend, Rina. Her daughter sent me one of her mom's cards after the holidays:


I love how she got that knot to look like that...so I carefully loosened it to see how she did it!

NOTE: Starting in February, I'll be posting my PIN IT FRIDAY FAVS about two times a month ^_^ Sign up in the column to the right ("Follow by Email") to receive my future posts delivered via your email.

Friday, January 9, 2015

PIN IT FRIDAY FAVS:
Birthday Cards

My new favorite birthday card on Pinterest:

SU Simply Sketched set * Great card using kraft and tangerine tango from pandacream-creations.blogspot.com

Such a lovely card and it uses a set I already have but haven't stamped with until I saw this Pinterest pin! For my version, I printed up the background so I could make this card again in the future very quickly:


STAMPIN' UP SET: 
Simply Sketched

INK COLORS:
Chocolate Chip
Crumb Cake

COPIC MARKER COLORS:
YR00, YR02, YG03, YG09

The inside paper was a tad short, so I added the gingham ribbon at the top. Another happy little opportunity to create something even better!...and here are a few more birthday pins that caught my eye recently:

Minion birthday card - LOVE the minions (even purple ones :) )
Original Pin HERE

I'll keep that one and this one in mind if I need a birthday card in a hurry:

Stampin' Up! ... handmade card from penguinstamper ... clean and simple ... one layer ... butterfly die cut from sheet music ... birthday greeting serves as a flight trail ... wonderful!
Original Pin HERE

....and lastly...the PERFECT card if you live here in San Jose and have a Sharks Hockey Team fan with a birthday:

Shark Card for Big D!! Very cute for a boy birthday! Made with 4" ovals and pennants punch. Mouth opens and closes :-D
Click HERE for Original Pin

HAPPY NEW YEAR and HAPPY CARD MAKING in 2015!

Friday, January 2, 2015

PIN IT FRIDAY FAVS:
Cards from My MUST MAKE Board

I keep a MUST MAKE board on Pinterest that are the pins of projects that I want to make now rather than later. These projects are the ones that caught my eye recently:

First up, a gift card holder and greeting card all in one:

I found this on stampinup.com
Original Pin HERE

...and a card using SU's Banner Blast stamp set
and coordinating banner punch:

Stamp With Sandy: Banner Blast Hello, DD95 & SC
Original Pin HERE

GORGEOUS! Try this!
Original Pin HERE
I have this PUNCH POTPOURRI SU set and have never used it!

Card Box tutorial - holds 10 standard sized cards and envelopes - 11" square sheet makes one.
Original Pin HERE

Stampin' Up
Original Pin HERE

...and lastly, I do love a simple black and white card:
luv this black and white card with the nine patch done in circles, each one stamped with a different image...
Original Pin HERE

Now, I just need to carve out some time to make some of these lovely pins! Happy New Year!