Happy Dancing

Happy Dancing

Sunday, June 27, 2010

FREEBIE for 4th of July!


CLICK to enlarge photos, then click on your
back button to return here for your FREEBIE below!

We just got back from a vacation to Napa and Monterey with my college roommate, Linda. I don't think we could have squeezed in any more fun if we tried...and we all came back feeling so relaxed and happy! I needed to make up a thank you/4th of July card for Linda to thank her for treating us to so many surprises on this trip...so I came up with this quick star wreath design.


To make this star card, adhere 6 stars to a 3" square base as shown below:


Then put a small piece of foam tape on the backs of the next 6 stars (see star in lower left corner below) and adhere each one in between two stars (varying the color and pattern) as shown below :


(Medium Star Squeeze Punch by Fiskars)

Since I was making up the saying on my computer for this card, I made a whole sheet to give each of you as a thank you for reading my blog! Simply click on either of the two links below to download a sheet of your own sayings, print the pdf on white cardstock and punch each saying out with any paper punch. Complete the tag by raising it with some foam tape then add some bling! BTW: The papers are OLD GLORY scraps and some solid Bazzill cardstock I had sitting around from my June Club Card project seen HERE...and this star card design can be used for Christmas, birthdays, etc.


I hope we all  celebrate the brave men and women who protect our freedom and Happy 4th of July to all of you!


Download the FREE
Celebrate Freedom tags

Wednesday, June 23, 2010

A New Arrival

We have a Red Egg Party (a Chinese banquet celebration for the birth of a baby) coming up soon in our family, and I used this cute little baby card idea by Mercedes Weber to make a card for the newest little baby boy in our family. Her idea is just adorable....and at first, I didn't notice how she added shading to the little chick head, the wing tips and cheeks --- it's those details that really make it look professional! 


Here is my my 1st attempt ---
without the color shading:


and here's my final version --- with the color shading and
some new heart-shaped feet:


I didn't have any googly eyes, so I used large adhesive pearls and dotted each one with a Sharpie marker...and when I stamped the sentiment, the ink smudged...so I re-stamped it on white cardstock, punched it out and raised it up with foam tape...another happy little opportunity to fix a mistake! (Note to self: Maybe a little blue shading on the oval would have been nice, too!) 

To visit Mercedes website, click HERE. Stamps: SU Curvy Verses; 1 3/8" circle, large oval punch, open scallop punch and circle scallop punch; misc. gems; cardstock scraps left over from my card posted HERE. (OMG --- I just fixed a typo --- I had left off the first "s" in "scraps" --- I would have died from embarrassment if I had done that!)

Sunday, June 20, 2010

More Ribbon Weaving!


Here are two more non-holiday cards made using the ribbon weaving technique that I'll be demonstrating in my July 18th Christmas in July Class at Scrapbook Island. For more details, see the Tea Party info. in the right column...and to see the post showing my original Christmas cards using this technique, click HERE

Saturday, June 19, 2010

CARD MAKERS' BARGAIN!


Oh, how I love a bargain...and it's even more thrilling if the bargain is related to paper crafting! For only $3, I got this entire bucket of flowers - YAHOO - that was the best $3 I've spent in a long time! I found these flowers at TJ Max as I was waiting in the long check out line. (They're pretty darn sneaky to let you continue to shop even as you wait!) 


I recently added a subscriber and followers section in the right-hand column, and if you are a follower or subscriber, I'll randomly pick a winner in 2 weeks from that group to win this card PLUS enough supplies to make your own card! I'm ecstatic that this site has received over 15,000 hits in just a few weeks --- THANKS SO MUCH for making me smile!


Be sure to watch my YouTube videos to tie perfect knots and bows. Click HERE then click on the FREEBIES tab to watch those videos.


Cardstock paper: Linen Closet paper stack by DCWV; Martha Stewart adhesive pearls; saying done on my computer

Friday, June 18, 2010

Here Comes the Bride


My son asked if I could make up a card for a friend's upcoming wedding, and I used my Cuttlebug Textile Hearts cutting and embossing folder set to create this card. (Thank you, Alice, for that wonderful Cuttlebug gift!) I saw a card for inspiration --- check it out here --- so darn clever! Stamp: SU Congrats; Stampendous Detail Silver embossing powder; SU Open Scallop Punch; Tulle was used at the top of the bride's heart 

Thursday, June 17, 2010

RIBBON WEAVING


Here are a few card samples of the ribbon weaving technique I'll be teaching at my July 18th Christmas in July Tea Party Class at Scrapbook Island. This looks a lot harder than it is....so come and learn the secrets to making your 2010 Christmas card with the WOW! factor by calling (408)978-89oo to attend this class. (More Tea Party info. is provided in the column on the right.) I'll be posting non-Christmas ribbon weaving cards on Sunday...so check back then.
(Stamp in center of middle card: SU Spotlight on Christmas with Real Red ink)

Thursday, June 10, 2010

I LOVE MY CRICUT AND NESTIES TOYS!


I haven't used my Cricut for quite awhile, and I pulled it out to make a few flowers for my friend Suzanne who loves Cricut flowers. She has resisted buying a Cricut - so far! However, I must say that owning a Cricut is a black hole when it comes to buying new cartridges...but I have everything in one under-the-bed storage container and I'm vowing that I won't go to a bigger box!! I do love using my Cricut and I finally had the time to pull it out and have some fun!

This card uses the Big Scallop Circle Nesties (that I had to have recently!), the Walk in My Garden Cricut cartridge for the flowers, Recollections adhesive pearls, two types of ribbon (layered and held in place with a brad that fits through a hole in the background layer), and the paper is from a paper stack by Heidi Grace called Sparkle.

Sunday, June 6, 2010

CHRISTMAS IN JULY CLASS


Over the next few weeks - until my July 18th CHRISTMAS IN JULY CLASS at Scrapbook Island - I'll be posting pics of projects that will be included in this fun class for all paper crafters. Here is the first project: Every year for Christmas, I design a favor/gift idea using a Tic Tac container. Each person who attends this class will receive all of the measurements, templates and how-to instructions to make this paper craft. 


Saturday, June 5, 2010

BBQ Card for Uncle Mike


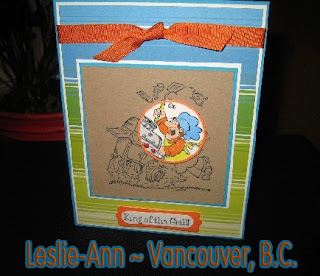
Here's a masculine birthday or Father's Day card idea. We're giving my brother-in-law a gas grill for his birthday, so of course...I had to make him a BBQ card! I used my Nesties and some real birthday candles for this one. I'll put it in a clear envelope on the night of his party --- I don't think this one would go through the mail without breaking those candles, but you could make some paper ones and attach a bow if you had to send it via snail mail. (BTW - I used the Stampin' Up slot punch and a 3/4" circle punch to make the handle for the BBQ)..and here's a terrific BBQ card from my wonderful paper crafting pen pal, Leslie-Ann, in Vancouver, B.C. - What a great idea she used for this King of the Grill Stampin' Up stamp! It's the perfect way to make a card when you're using a mega-size stamp.

Friday, June 4, 2010

Card for DADS!


Here's a Father's Day card that would surely make the dad or grandpa in your family smile!