Happy Dancing

Happy Dancing

Friday, October 29, 2010

MATTING CHART

One of my favorite blogs on the net for simple, quick and stunning card designs is called Simplicity by blogger Susan Raihala. She has a chart on her site that takes all of the guess work out of measuring mats and layers for your 4 1/4" x 5 1/2" A2 cards:


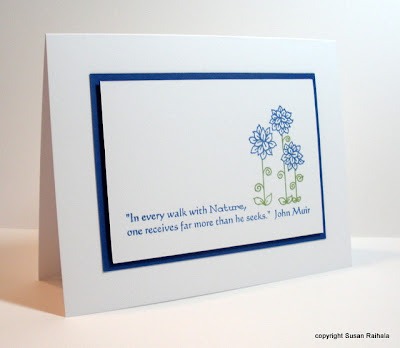
SUSAN'S SIMPLICITY SAMPLE CARD


....and speaking of SIMPLICITY...since I'm no longer teaching paper crafting classes...this will be my last blog post indefinitely. I encourage you to keep on making those one-of-a-kind pieces of handmade paper craft art that bring a little bit of happiness into the lives of others...and MANY THANKS to all of the people who have visited my blogs throughout the years! 


HAPPY CRAFTING!

Thursday, October 28, 2010

FREE TUTORIAL THURSDAY: Best on the Net


I recently took a class to become a Copic Designer and two of the most important things I learned were how to shade using 2 or more colors AND that coloring like a pro with Copic markers takes a lot of practice! If you'd like to see a Copic coloring pro in action, then check out this video tutorial HERE on coloring skin tones from Sherrie who is a Copic Design Team Member. On her website, you'll find several Copic video tutorials located on the right side of her blog HEREStamp Set: Fluffles the Cat

Sunday, October 24, 2010

BIG SMILES ACROSS THE MILES


I received this lovely card from my Canadian pen pal, LA, and it just happened to arrive when my sewing machine decided to up and die! I needed to make a quick repair on a blouse, got the machine out, plugged it in...and without me touching the foot pedal...the machine ran at top speed --- almost like a ghost was using the sewing machine --- it was FREAKY! The repair man broke the news to me that the mother board was bad. Of course...the most expensive thing on this wonderful Viking machine!...AND here's the worse part: The machine is not mine! It belongs to my terrific sister-in-law, but I've had it at my house for many years because she hasn't been into her former hobby of sewing for eons. It's Murphy's Law --- you borrow something and it breaks on your watch! 
THANKS FOR MAKING ME SMILE BIG TIME
WITH YOUR CARD, LA!
I needed that!

Thursday, October 21, 2010

FREE Tutorial Thursday: Best on the Net!

Taylored Expressions is presenting 12 Days of A HANDMADE CHRISTMAS. Day One was a video to show how to make the frame below out of ribbon and scrapbook papers for gift giving this holiday season:
To view this video, click HERE - and to see all of the 12 Days of Christmas projects (including a yummy caramel recipe with handmade box), click on the badge below:


A Handcrafted Christmas

Monday, October 18, 2010

Halloween Smiles

I wish you could see this card in person from my oh so talented card making friend, Rachel Kong! The glitter on the perfectly cut out cupcakes sparkles and adds quite a stunning effect to this card. I put it on my island so I could enjoy it every time I walked into the kitchen, and my husband walked by and said, "Wow! This is great!" I told Rachel that is THE BEST compliment you could ever receive for a handmade card --- that a husband would stop, comment on it and give it a rave review! 

Thursday, October 14, 2010

FREE TUTORIAL THURSDAY


After my ribbon wreath tutorial was posted on the Really Reasonable Ribbon blog, the company owner Bonnie wrote to tell me that readers of their blog had sent her several comments and pics. Knerten from Oslo, Norway sent this pic of her lovely ribbon wreath creation:


...and you can try this simple but stunning technique by watching my FREE video tutorial HERE.

Thursday, October 7, 2010

FREE Tutorial Thursday: Best on the Net!


Halloween is the perfect time to make a treat bag.....and here's a bag tutorial by Angela - the oh so talented Stampin' Up Demonstrator of my wonderful card maker pen pal in Vancouver, BC. Thanks for sending this idea to me, LA! To view the step-by-step photos to make this project, click HERE - then try adding an embellishment to your bag like the one that was highlighted in my September 30th FREE TUTORIAL THURSDAY shown HERE...and to learn the quickest and easiest way to line an envelope of any size to match your cards, click on the photo in the upper right column or click HERE. How about matching your cards with the envelopes and placing them in a matching bag for a one-of-kind handmade gift?!

Monday, October 4, 2010

Spooky Halloween

 CLOSE UP:

Here's a fence idea to try for your Halloween cards: Use black satin ribbon (3/8" to 1/2" wide) for fence boards (cut with VERY sharp scissors), then place two - 1/8" x 5 1/2" long pieces of textured black cardstock on top of the black fence boards. Zig Two-Way Glue with a chisel tip works well to glue down the ribbon and the skinny pieces of cardstock...and below, I have one of several cards I designed this week for


Those googly eyes (5mm in diameter) were purchased from my local craft store and truly add a spooktacular  touch to this brayered background card. (TIP: Use a toothpick dipped in some white glue to put a small amount of glue exactly where you want the eyes to be placed.) The black cats were made using my new Happy Hauntings Cricut cartridge --- I was able to cut out several in no time! (The size of cat shown uses the 1" setting --- a 1 1/4" setting works well, too.)


If you want to see how I easily tied the teeny tiny bows on the cats, watch the quick video HERE...then click HERE to view all of the cards I have on the Really Reasonable Ribbon's blog today as their guest designer.  


Stamp Set: Branch Out (Stampin' Up)
Inks: Black Stazon for the tree, Celebration (Stampin' Up) multi-colored ink pad for the brayered background on glossy paper
NOTE: Use a circle punch with computer paper and repositionable adhesive prior to using the brayer to create the white moon in the second card
Cuttlebug Embossing Folder for the Moon: Swirls
Fright Night Saying: K&Co. Halloween Sentiment Assortment


Thursday, September 30, 2010

FREE TUTORIAL THURSDAY!

Add your creativity to a pre-made bag and learn the secret to
make the versatile embellishment shown on the left:


Visit the Hero Arts blog and watch the video today!
Click HERE to view.


....and I had a chance to use this tutorial and some K&Co. DSP
to make this version today:


Sunday, September 26, 2010

Side Step Halloween Dresser Card

Here's a card that will be sure to give your friends the WOW! factor when they open up your Halloween card! I used Jackie Topa's side step dresser card idea to make this Halloween version. (Her fantastic video tutorial can be seen HERE.)
INSIDE THE CARD:

I used Stampin' Up's Itty Bitty Backgrounds for the tiny background black dots on the sayings, their Vanilla Shimmer Smooch mist to give this card an ethereal look, Martha Stewart's bat punch with two mini gems for the eyes, the SU Curly Label punch and the SU Scallop punch for the decorative edges on the front of the card (but you can improvise with any punches you already have.) The inside saying was done on my computer.

Sunday, September 19, 2010

BLOG CANDY WINNER

To celebrate reaching over 20,000 hits since I started this new blog in April, I'm so happy to report that Terry O. of Sunnyvale, CA is the blog candy winner in a random drawing - #129 out of 143 subscribers and blog followers! Terry --- I'll be contacting you ASAP to get all of the loot to you!...and MANY thanks to all of you for stopping by my new blog!


Friday, September 17, 2010

Class this Sunday!


Learn how to make THREE projects using an envelope at my class this Sunday! The project shown above also makes a great CD/DVD storage sleeve. See the how-to demo and get exact measurements to make your own! View class topics and registration information in the left column. Hope to see you there!

Thursday, September 16, 2010

Masculine Birthday Card

Have you ever made a card and then had a hard time giving it away? That happens to me quite often, so I usually make more than one of the same card while I've got everything out....but this card was a one-of-a-kind and I never got around to making another one....so, it's been in my blank card box for ages because I could never give it away....until now! My brother-in-law's birthday was last week and enough time had passed by so I could finally part with it! 


I masked each rectangle with Post-It Notes at the top and bottom and used the same stamp for all 3 images --- changing the direction of the stamp on each rectangle. It's actually a quick and easy technique --- I don't know why I didn't make two!


Stamp Set: Close to Nature from Stampin' Up

Friday, September 10, 2010

Thank You Cards


I was surfing on the net and came across the lovely card below by Becky TE and stopped everything to try a version of her beautiful card. I needed a thank you card and this turned out to be such a wonderful source of inspiration --- Thank you, Becky! The red and green version would also make a great Christmas thank you card --- Oh, wouldn't it be great to be THAT organized and get them done ahead of time?! (No...I'm not THAT organized!)


BTW - See those teeny tiny gems in the center of the flowers above? In my upcoming Sunday, September 19th class at Scrapbook Island (408.978.8900), I'll be showing a clever way to place those mini gems with precision and without them sticking to your fingers instead of the paper! (Click each photo to see a close up, then click on the back arrow)


Thank you stamps from THE STAMPS OF LIFE, border punch from MARTHA STEWART, leaf and flower punch: STAMPIN' UP!


Monday, September 6, 2010

My Favorite Things


This panda bear and the "LOVE" black frame were made with one of my all-time favorite Cricut cartridges called Pagoda. I LOVE panda bears and if you look closely, you'll see a panda head in the "O" of "Hom" in my watermark! I cut a small piece of green cardstock to make a piece of bamboo for the panda's mouth and added opaque white ink (by Uniball) for the eyes. The inside of this card and the envelope are shown below. The stamp set I used is called Asian Influences by INKADINKADOO.


Thursday, September 2, 2010

Anniversary Card for a Special Couple


It's my wonderful in-laws' anniversary, and when I saw this cute Asian couple over on Patti's blog, I knew they would love a card like this! They are always so happy every time I make a card for them, and I hope this card will make them smile from ear-to-ear! Patti is one clever paper crafter, and you will love seeing her giraffe made out of punches ---- just click HERE to go to her punches blog post to find the recipe for this Asian couple and the giraffe.
Background Paper: Sizzix Square Lattice Exclusively for Stampin' Up
Nesties: Labels 3, Small Scallop Ovals, Small Classic Ovals
Punches: Three for You flower punch and Label Punch (SU), 1/2", 1" and 1 1/4" circle punches

Thursday, August 26, 2010

Bat Boxes Photographed in a Light Box


In my upcoming September 19th class, I'm going to demo how to make a light box to professionally photograph any item with an infinity background as shown in these two photos.


I made these little treat boxes to hold a wrapped Hershey's Nugget based on an idea I saw online. I've modified the original idea so I can crank out these Halloween treat boxes using my Walk in My Garden Cricut cartridge (see page 129 in the booklet, use the shift key and cut on size one and a half). To begin, cut out two identical shapes from the same medium weight DSP (Designer Scrapbook Paper). This Cricut envelope shape has one flap that is larger than the other three. Cut off 1/4" from the end of each of the three smaller flaps on both DSP pieces as shown by the red arrows below. Using a bone folder, fold in the flaps on all four sides. Punch a 1/2" circle in the center of the larger flap on both DSP pieces. On one of the DSP pieces, place adhesive on all flaps EXCEPT the larger flap as shown by the red arrows below. (I used Crystal Effects for the adhesive.) 


Join the two pieces by adhering the flaps opposite the larger flaps with the holes, then adhere the remaining flaps by bringing up the sides and placing the box base on a flat surface. Be sure all sides are properly aligned when adhering the flaps so that the box will stand up properly. Cut a 1 1/16" length of the same DSP and adhere it around a Hershey's Nugget. 


Place the wrapped candy inside the box
and secure the box handles with a piece of ribbon.
You can find this wonderful gold-edged black satin ribbon at
Scrapbook Island in their HUGE ribbon section!

The Details:
Stamp: Batty for You (Stampin' Up)
DSP: La Creme Matstock (DCWV)
Punch: Bat Punch (Martha Stewart)
Mini gems for the bat eyes: Scrapbook Island
To see the original project, click HERE

Sunday, August 22, 2010

My Sons' Favorite Cookies!

In my Paper Crafters' Tea Party classes at Scrapbook Island, I always provide a tasting and recipe for a Hom Family favorite recipe. To promote my classes, here's a recipe below that tops the list for my sons' favorite cookies (and was the favorite cookie of their tennis teams as well). Because there are no eggs in this recipe, the dough can be eaten before cooking (if you're like me and LOVE raw cookie dough)! For my next Paper Crafters' Tea Party Class in September, I'll have a tasting and recipe for a dip to serve with fruit slices that is to die for! It's a dip that will be certain to make all of your guests VERY happy this Fall Season!

HERSHEY'S KISSES COOKIES
MAKES ABOUT 4 DOZEN COOKIES


Ingredients:
1 bag (10 oz.) Hershey’s Kisses
or Kisses with Almonds
1 cup (2 sticks – 8 oz.) butter
1/2 cup (3 ½ oz.) granulated sugar
1/2 cup (4 oz.) packed light brown sugar
1 t. vanilla
2 (10 oz.) cups all-purpose flour
1 cup (6 oz.) mini semi-sweet chocolate chips
Plus for the Chocolate Drizzle:
1/4 cup (1 ½ oz.) mini semi
sweet chocolate chips
1 T. Crisco shortening


Directions:
Heat oven to 375º F. Remove foil wrappers from kisses. Beat butter, sugars, and vanilla until well blended. Add flour and blend until smooth. Stir in chocolate chips. Mold a teaspoon of dough around each chocolate kiss, covering completely. Shape into balls, and with the point of the kiss facing up, place onto a cookie sheet lined with Release or non-stick foil and bake for 10 minutes or until set. Only the edges will be golden brown - do not over bake! (See the picture above.) Remove foil sheets to the counter and off of the cookie sheets. Let cookies cool slightly. Remove cookies to a cooling rack. Fold foil sheets over in half and line up cookies side-by-side. Drizzle chocolate across tops using the handle end of a fork (see recipe below). Transfer to fridge or freezer to set chocolate drizzle. Remove after 10 minutes.


Chocolate Drizzle:

Place 1/4 cup mini chocolate chips and

1 T. shortening in small microwave-safe bowl or cup.

Microwave on high for 30 secs. – stir well. 

Continue to microwave at 20 sec. intervals - stirring in between intervals -

until chocolate is melted and smooth when stirred.


Ounces are given in the recipe for those who have
discovered the joy of baking with a digital baker’s scale.
I'll be giving a how-to demo on digital scales
in my November class!

Monday, August 16, 2010

Alice's Birthday Card AND Contest Won!


Many of you know my SUPER talented card making friend, Alice, and it was her birthday last week. I wanted to make her a special card because I knew she would appreciate every little detail. This is a surprisingly quick way to make the ever popular side step cards. I'll be showing this simple technique in my September 19th Paper Crafters' Tea Party Class so you can make them to WOW your friends and family!

....and yippee!....over the weekend I found out that I had won 1st place in a challenge contest by Really Reasonable Ribbons for this card: 

FOR THE DIRECTIONS to make this card, click HERE.


Really Reasonable Ribbon

Friday, August 13, 2010

Variations on a Black and White Theme


Here are a few variations on my all black and white card posted HERE. I used SU's Garden Collage stamp set (retired), but you could try a black and white card with just a few parts of any stamp highlighted with color. It makes for a quick and easy card and spotlights the most important aspects of the stamped image. 

Color was added with the following Copic markers for the sunflower:
and for the butterfly:

...and finally...Crystal Stickles were added to the butterfly wings along the veins to add some bling to the final appearance.


Be sure to visit the Really Reasonable Ribbon blog and their current black and white challenge for more inspiration by clicking HERE or check out their current challenge at http://reasonableribbon.blogspot.com and click on the current challenge box in the upper left corner.

Nestibilities: Small Classic Scallop Rectangles, Small Classic Rectangles and Labels 4
Sizzix: Square Lattice Embossing Folder (A Stampin' Up exclusive) 

Sunday, August 8, 2010

20,000 Hits in 4 Months!

It's time for some...drum roll please....
SUPER SWEET BLOG CANDY!!! 
I can't thank all of you enough for visiting my new blog here and for attending my classes!
To show my appreciation....
I'm having TWO drawings! 

DRAWING NUMBER ONE for those who subscribe or follow my blog, the winner will receive a package mailed to you filled with approximately $25 worth of paper crafting embellishments plus the card shown below, and...


DRAWING NUMBER TWO for those who register and attend my September 19th Tea Party Class at Scrapbook Island (408-978-8900), you will be entered into a special drawing for this collectible made in England Wedgwood Peter Rabbit bowl below worth approximately $50 plus the card shown above!


THESE TWO RANDOM DRAWINGS will take place on Sunday, September 19th...so...sign up to receive my blog updates (in right column), and if you live in the Bay Area, call Scrapbook Island (408-978-8900) to sign up for my next Paper Crafters' Tea Party Class. (See class details in the right column.)


MANY THANKS to all of the paper crafters who have stopped by my blog for a visit! I hope you found a little something here that might have sparked your creativity and made you smile 


This card was made with the Stampin' Up Garden Collage (retired) set.