Here's another example of the same sponge and masking technique that appeared in my previous post HERE as seen on Michelle Zindorf's blog. I love this new Frightening Feline SU stamp and the bats are once again thanks to a Martha Stewart punch. Adding mini adhesive gems for the bats' eyes really makes these little guys pop! (The saying is from SU's Teeny Tiny Sayings.) View another wonderful Michelle Zindorf masking and sponging tutorial by clicking on her card below:
My Cricut came to the rescue to create this card. I did a Google search for free Halloween SVG and SCAL files and found one for a haunted house HERE! The bat is a Martha Stewart punch and the moon/sky sponge technique was inspired by the very talented and creative Michelle Zindorf shown HERE. Thank you, Michelle!
This card is larger than an embossing folder, but looks like it was run through once - even though a standard embossing folder normally would not cover the entire front of this 5" square card. Here's the trick to give the illusion: Using a Cuttlebug, first run the embossing folder through at the top of the card along the folded edge...then a second time with the folder placed at the bottom of the card edge. (You could also cut to size two different halves to adhere to the front of a card then add a ribbon to hide the seam.) Using a sponge, I added green to highlight the raised image, then added a wide ribbon then a thinner ribbon to cover where the embossing folders met slightly below the middle of the card. The paper flower is from Paper Source.
I love this edgelet and embossing folder from SU! A set of flower stickers from Martha Stewart and the thanks stamp from SU Hodgepodge Happiness was also used to complete this card. HINT: Secure the die with Post-It Notes so the die will not move in the Cuttlebug! Thanks, Brenda, for that terrific tip!
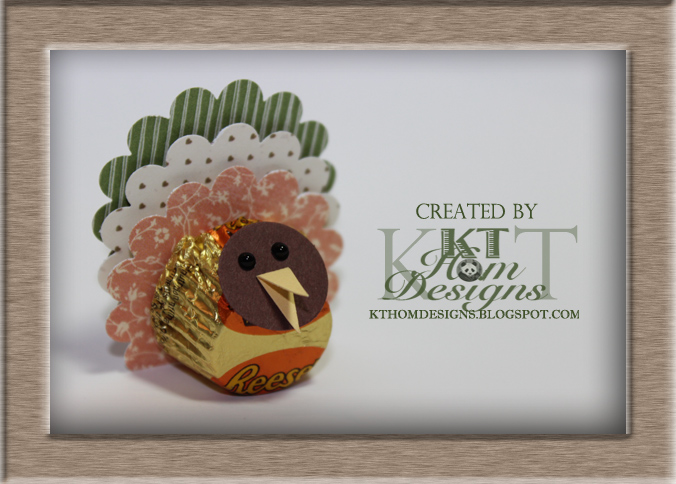
I saw a cute favor to make for Thanksgiving on Pinterest, tweaked it a bit and came up with a slightly different idea. Oh, how I love to craft! These little guys will make nice table favors and I can use up some paper scraps in the process! I used thin foam tape to attach the Reese's cup to the first scallop circle (placed closer to the top of the Reese's), then I used thicker foam squares to place between the remaining scallops. A rolled glue dot holds the 3/4" head onto the Reese's cup at an angle by placing the glue dot at the edge of the Reese's , and I squished the Reese's cup slightly so it would sit upright nicely. BTW - The eyes are black adhesive gems from Michael's and the beak was created by scoring a 1" yellow strip of card stock in half, folding in half with a bone folder, then cutting a triangle along the folded edge.
Updated version with heart feet:
...and here's the turkey that gave me inspiration:
It's my dad's birthday this week and he's an avid golfer. Even at 83 he still plays twice a week - GO DAD! I found the saying online and it gave him a chuckle.
and the envelope using a mask and sponging...
Here is the inspiration for this card that I saw on Pinterest:
For this slider card, I used a new simplified method. It's an awesome version of the slider cards that were popular several years ago and this technique also uses Zip Loc bags for the slider mechanism - GENIUS! After making this type of card several times, I did discover that both the crease and the overlap in the plastic have to be placed properly so that the card slides effortlessly. (Make sure that the crease and the overlap on the plastic bag do not slide over any edges when the panels move.)