Happy Dancing

Happy Dancing

Thursday, October 25, 2012

BATTY CAT


Here's another example of the same sponge and masking technique that appeared in my previous post HERE as seen on Michelle Zindorf's blog. I love this new Frightening Feline SU stamp and the bats are once again thanks to a Martha Stewart punch. Adding mini adhesive gems for the bats' eyes really makes these little guys pop! (The saying is from SU's Teeny Tiny Sayings.) View another wonderful Michelle Zindorf masking and sponging tutorial by clicking on her card below:


Thursday, October 18, 2012

HALLOWEEN HAUNTED HOUSE


My Cricut came to the rescue to create this card. I did a Google search for free Halloween SVG and SCAL files and found one for a haunted house HERE! The bat is a Martha Stewart punch and the moon/sky sponge technique was inspired by the very talented and creative Michelle Zindorf shown HERE. Thank you, Michelle!

Projects by the Card Chicks

Here are the favors from our
Card Chicks meeting last week. 


My mom spent one month in China and brought back these favors for us:


...and here are the projects we all made at our meeting:


I posted this Reeses turkey before...but now they have
a pair of feet that one of the Card Chicks thought to add...VERY creative!
CLICK HERE for directions.

Thursday, October 11, 2012

Card Chicks Creations

It was my mom's 80th birthday last week and here are some of the cards she received from our talented Card Chicks to celebrate her milestone birthday:


Thursday, October 4, 2012

Use Wide Ribbons and an Embossing Folder Twice!


(CLICK ON PHOTO FOR LARGER IMAGE)

This card is larger than an embossing folder, but looks like it was run through once - even though a standard embossing folder normally would not cover the entire front of this 5" square card. Here's the trick to give the illusion: Using a Cuttlebug, first run the embossing folder through at the top of the card along the folded edge...then a second time with the folder placed at the bottom of the card edge. (You could also cut to size two different halves to adhere to the front of a card then add a ribbon to hide the seam.) Using a sponge, I added green to highlight the raised image, then added a wide ribbon then a thinner ribbon to cover where the embossing folders met slightly below the middle of the card. The paper flower is from Paper Source.

Friday, September 28, 2012

Some of My Favorite Pins

Here are some of my favorite pins on Pinterest lately. 
Can you tell I love butterflies?!

Pinned Image

love!

Me, My Stamps and I

Stampin' Up ideas and supplies from Vicky at Crafting Clare's Paper Moments: Pocket Silhouettes thank you

BEAUTIFUL Butterfly Card


Friday, September 21, 2012

A Thank You Card

I love this edgelet and embossing folder from SU! A set of flower stickers from Martha Stewart and the thanks stamp from SU Hodgepodge Happiness was also used to complete this card. HINT: Secure the die with Post-It Notes so the die will not move in the Cuttlebug! Thanks, Brenda, for that terrific tip!


Friday, September 14, 2012

Card Divas!

Here are all of the projects from my
Card Divas meeting last week:

 Alice's Cards

 Christie and Michele's Cards

  Close Up of Michele's Card and Inside Insert

Michele's Treat Bag


My Card

Thursday, September 6, 2012

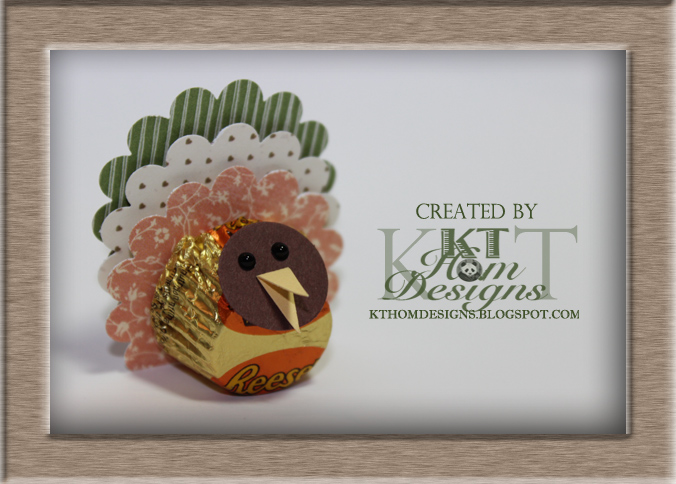
Reese's Turkeys!

I saw a cute favor to make for Thanksgiving on Pinterest, tweaked it a bit and came up with a slightly different idea. Oh, how I love to craft! These little guys will make nice table favors and I can use up some paper scraps in the process! I used thin foam tape to attach the Reese's cup to the first scallop circle (placed closer to the top of the Reese's), then I used thicker foam squares to place between the remaining scallops. A rolled glue dot holds the 3/4" head onto the Reese's cup at an angle by placing the glue dot at the edge of the Reese's , and I squished the Reese's cup slightly so it would sit upright nicely. BTW - The eyes are black adhesive gems from Michael's and the beak was created by scoring a 1" yellow strip of card stock in half, folding in half with a bone folder, then cutting a triangle along the folded edge.


Updated version with heart feet:


...and here's the turkey that gave me inspiration:


Sunday, September 2, 2012

Golfing Card for Dad's Birthday

It's my dad's birthday this week and he's an avid golfer. Even at 83 he still plays twice a week - GO DAD! I found the saying online and it gave him a chuckle. 


and the envelope using a mask and sponging...


Here is the inspiration for this card that I saw on Pinterest:


For this slider card, I used a new simplified method. It's an awesome version of the slider cards that were popular several years ago and this technique also uses Zip Loc bags for the slider mechanism - GENIUS! After making this type of card several times, I did discover that both the crease and the overlap in the plastic have to be placed properly so that the card slides effortlessly. (Make sure that the crease and the overlap on the plastic bag do not slide over any edges when the panels move.)

Slider Card Tutorial:


Saturday, August 25, 2012

Oh, Baby!

This is the card I made for Linda's daughter's new baby boy THOMAS! Welcome to the world little one!...and the second pic shows my inspiration...
a card I saw on Pinterest:


...and my inspiration:


I love cards with plenty of white space...and I had a happy little opportunity when I stamped the saying too high up from the bottom. To fix it, I used my new SU edgelit embossing folder to balance the white space!


Stamp: A Word for You SU
Ink: Blue Bliss SU, Basic Black
Clouds: Cricut with Blue Bliss sponged onto edges

Monday, August 20, 2012

Brenda's Make n' Take Today


My very talented friend and SU Demonstrator, Brenda Keenan, is offering this Make n' Take at Cottage Crafts in San Jose today from 11:30 am to 1:30 pm!

Stamps:  Pleasant Poppies, Petite Pairs, Papillon Potpourri
Ink:  Black Stazon, Primrose Petals
Paper:  Basic Black, Very Vanilla, First Edition Designer Series Paper
Accessories:  Eyelet Border Punch, Dimensionals, Elegant Butterfly Punch, Large Oval and Scallop Oval Punches, Primrose Petals Stitched Satin Ribbon

Friday, August 17, 2012

Happy Birthday to Alice!


This is the birthday card I made for a wonderful friend's birthday using my Blossom Petals Builder punch and the Tulip Frame embossing folder both from Stampin' Up. (The Happy Birthday stamp is from the Create a Cupcake SU set.) I cased this card from a Pinterest post shown below:


Monday, August 13, 2012

Treat Holder for Halloween


Here's a quick treat holder for
a Ghirardelli chocolate square or 3 Hershey Nuggets:

Start with a 3 1/4" by 8 3/4" piece of DSP

Score along the length at 3/4", 4 1/4", 4 3/4" and 5 1/4"

Use a bone folder along each score line 
(The 4 3/4" score line is the only valley fold)

Add the candy using glue dots, close the folder
like a matchbook then
punch each side with a rectangle punch

Add a ribbon, tie in a bow and add a label!

Friday, August 10, 2012

Stamping with Acrylic Blocks


Here's a terrific technique with video to try! Watch the video below and create cards like these created by Andrea Hayes:


Monday, August 6, 2012

Cased Card!


Thank you, Marcia, for sharing this cased card you made after reading my post HERE! Your card is beeeeeeautiful and I'm so happy you sent this to me!

Thursday, August 2, 2012

My Triple Time Stamping Card


I tried the triple time stamping technique shown on my blog HERE and made this card for my mom. She just returned from a month-long trip to China where she taught English to students at Jiangnan University in Wuxi, China. Her students loved her so much and she let me read their wonderful thank you and goodbye notes written to her! My mom said the trip really made her appreciate the things we take for granted every day. Glad you're home, Mom!


Stamp Set: Best Blossoms (Retired, SU)
Ink: Lucky Limeade, Indigo Island, Pumpkin Pie, Rich Razzleberry