Happy Dancing

Happy Dancing

Monday, July 30, 2012

New Technique to Try!


These TRIPLE TIME STAMPING cards are popping up lately on Pinterest (like this one above from Angie Leach), and there are several wonderful videos out there to learn this simple technique. Here's one of my favorites below with the measurements written out for easy reference:

STAMPED: 2 x 3 1/4
MAT: 2 1/4 x 3 1/2"
*****
STAMPED: 3 x 4 1/4"
MAT: 3 1/4 x 4 1/2"
*****
STAMPED: 4 x 5 1/4"
CARD BASE: 5 1/2 x 8 1/2" folded in half


Video by DOSTAMPING on YouTube

Sunday, July 22, 2012

Butterfly Trio


My friend Michele loves butterflies as much as I do...and I was so happy to see this card! Very nice use of the SU Beautiful Wings Embosslit and terrific way she made each butterfly using three layers. The gems in the middle of the body give this card a finished professional look with the WOW! factor!

Monday, July 16, 2012

Remember This!

The guru of clean and simple card making is Susan Raihala, and today...she has a post on her blog that is a must read. Her last paragraph is a gem! She writes:

You have your own light to shine. I have mine. If our lights shine together for a while, well, that's just lovely, isn't it?

...and here's a not so clean and simple easel card I recently made...000h la la...I do love Paris!


Friday, July 13, 2012

Card from My Pen Pal

I LOVE birch trees and I love this card from my wonderful Canadian pen pal! Thanks, LA, for making me smile big time!

Wednesday, July 4, 2012

More Reasons to Smile!


This was in my mailbox yesterday from the
oh! so talented Rachel!
....and here's the pop up candy box I made
for Kevin's bday
thanks to a class from Rachel!


Monday, July 2, 2012

Happy 4th!


Check out the tutorial to make a Kris Cross card like this
at the bottom of this previous post: CLICK HERE.

THANK YOU FOR MAKING ME SMILE, LADIES!

Friday, June 29, 2012

Swing Card and Tutorial


We made a similar card like this
at Brenda Keenan's card class
and another stamper has posted a tutorial
for a similar card HERE.

Stamps: Thoughts and Prayers, Kindness Matters (Butterfly) and
Elementary Elegance (Happy Birthday)
Spellbinders: Labels 4 Die

Monday, June 25, 2012

Our Card Chicks' Christmas in June Projects


These are the projects we made at our Christmas in June card party! Learn how to make the Kris Cross card by viewing the video here: http://tinyurl.com/kriscross

Sunday, June 24, 2012

We Have a Name!


Last night, we had a meeting of our card group and we voted on a name. We're now officially called THE CARD CHICKS! Thanks to my DH for submitting the winning entry --- You're the BEST! Here's the chick pic before I Photoshopped it and added the cards we made the night we voted on our new name!


I wish there were more hours in the day for me to play with PS!

Thursday, June 21, 2012

Christmas in June


I love Christmas soooo much - and thankfully - I'm not alone! This Friday, some of my friends and family are coming over to make some cards to get a jump start on making our handmade Christmas cards!
  • Stamps by SU: Short and Sweet, Peaceful Season
  • Bird Punch: Martha Stewart
  • Red Glitter Paper by SU for birds
  • Second card done on my Cricut
  • Third card uses Labels 4 Nesties


Monday, June 18, 2012

SURPRISE! Box Tutorial

Surprise box  opened and closed

Crumb Cake & Comfort Cafe  box


OMG! I LOVE LOVE LOVE this surprise box idea AND the AWESOME video posted by Dawn Griffith! Just click on this link http://tinyurl.com/boxtutorial to make one, too! THANK YOU, DAWN!!!!

SU Crumb cake card stock #120953
  • cut a piece measuring 7 1/2" x 10"
  • score along the 10" side at 1 1/4", 2, 3 3/4", 6 1/4, 8, 8 3/4
  • score along the 7 1/2" side at 2 1/2" and 5"
SU Comfort Cafe Designer paper #126898
  • cut (6) pieces  at 1 1/8" x 2 3/8"
  • cut (4) pieces at 2 3/8" x 2 3/8"
  • cut a belly band at 1" x 11"

Thank you box  side view

Thursday, June 14, 2012

Bowler Card


I am so thrilled to have found a bowling card to case, and I found this creative use of punches from the oh! so talented Ellen Kemper on her blog HERE. To view more of her clever ideas for bowling cards, click HERE and spend some time admiring her inventiveness! HERE'S another one of my favorites by Ellen:


Sunday, June 10, 2012

Cards from Brenda's Class

Thank you, Brenda, for a night of fun
and learning new card tricks!


POP UP BIRTHDAY CARD
Stamp Set: Bright Blossoms
 Ink and Paper: Island Indigo, Lucky Limeade, Rich Razzleberry


SWING CARD
Stamp Set: Forever with You (Floral Spray), Papaya Collage (Butterfly),
Petite Pairs (Sentiments), Apothecary Art (For You on Card Front)
Ink and Paper: Midnight Muse
PLUS Labels Collection Framelit


DOUBLE GATE
Stamps: Kindness Matters, Heard from the Heart
Punch Border: Martha Stewart


NOTE: Brenda Keenan's Blog can be found at:
 http://keenankreations.blogspot.com/

Friday, June 8, 2012

Make These Paper Purses!

 I can't stop making this latest project! 


I modified the finishing touches from this wonderful how-to video shown HERE and I've included the measurements for a large and small purse below:

LARGE PURSE:
  • 12" square sheet of DSP
  • Score at: 4 1/4" and 7 3/4", turn 90 degrees and score at 2 1/2" and 9 1/2"
  • Straps: Cut 2 @ 5/8" x 12"
  • Flap: 2 1/4" x 5 3/4", score at 1 1/4" and 3"
  • Flap Holder: 5/8" x 3 1/4"
  • Flower: 3/4" circle and 1" circle, scrunch up each circle, layer with a small glue dot and adhere a leaf (scored in half)  using the wing from the SU bird punch
SMALL PURSE (My Favorite!):
  • 8 1/2" square sheet of DSP
  • Score at: 3" and 5 1/2", turn 90 degrees and score at 2" and 6 1/2"
  • Straps: Cut 2 @ 1/2" x 8 1/2"
  • Flap: 1 3/4" x 4 1/4", score at 1" and 2"
  • Flap Holder: 1/2" x 2 3/4"
  • Flower: 3/4" circle and 1/2" circle, scrunch up each circle and unfold slightly, layer with a small glue dot and adhere a leaf (scored in half) using the wing from the SU bird punch
...and here's a close up of the quick and easy flower used for this project:


Friday, June 1, 2012

Modified Tie Card


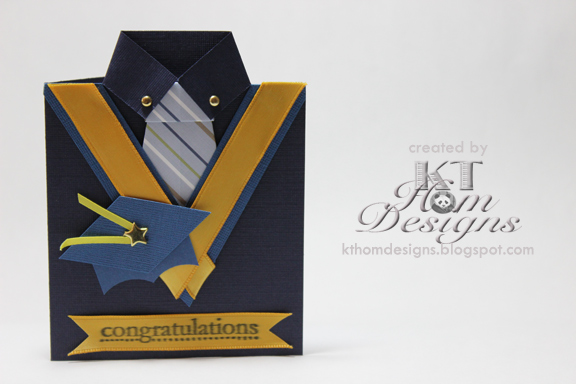
I modified the tie card from my previous post HERE and turned it into a graduation card with the student's school colors! Visit that previous post to view the video tutorial and download the written origami folding instructions for the tie....and click HERE to see a female version of this card.

Wednesday, May 30, 2012

Favorite Saying

I love this saying that I saw today on splitcoaststampers.com
for their Honeycomb tutorial HERE.

Monday, May 28, 2012

Black and White Classic


Here is a card I gave my friend Rina. I've provided the measurements and a sketch to remember how to assemble the various layers. 


  • Begin with a black card base folded in half at the top 
  • Adhere the 3/4" x 4 1/4" piece of patterned paper approximately 1/2" down from the top
  • Add the center rectangle with the stamped flower (see measurements below)
  • Adhere the black lower piece of cardstock on top 
  • Finish with a black satin 1/2" ribbon at the top plus gems in the lower right corner
  • Place several tiny crystals on the flower for some bling!
This was my one and only version of this card - it's hard to give it away...so I'd better make another similar one because I love it so much! (It's been awhile since I made it and I can't remember the name of the stamp set --- it's that Alzheimer's guy AGAIN!)


Inside View

Monday, May 21, 2012

Make an Any Size Envelope

I love coordinating envelopes with the same paper that I use to make my cards and Splitcoaststampers has a nice written and video tutorial (at the end of the instructions) for making your own envelopes. Check it by clicking HERE.

Saturday, May 19, 2012

Video with Secrets for Making the Perfect Bow or Knot!

I just got a new DSLR camera and made my first video tutorial with it today. In less than 3 minutes, you can learn how to make that perfect bow or knot! Watch the video by clicking on the pic above.
Here are some previous bow tutorials: