Happy Dancing

Happy Dancing

Friday, April 24, 2015

PIN IT FRIDAY FAVS:
The Very Best of Recent Pins on Pinterest

POOCH CARDS
My terrific pen pal sent me a pic of a thank you card that she made recently and it made me smile from ear-to-ear!
STAMP SET:
Puppy Power (CLassic Collection)
from
Cornish Heritage Farms

I love the saying with the background paper!
I searched the web and couldn't find this set available.
Now...I'll be on the search for dog DSP then
I can create the saying on my computer!
....and here are a few more cute dog cards I found
on Pinterest recently:

Original Pin HERE

Pooches Gracias for Sis by jacqueline - Cards and Paper Crafts at Splitcoaststampers
Original Pin HERE

FREE PRINTABLE TEMPLATE~  This Puppy Ears Card is a great craft to make for any occasion.  Invite parents to an open house, send a cheery get well greeting to a sick classmate, or make one to send overseas on Veteran's Day!
Original Pin HERE

Stampin' Up! UK Order Online 24/7 - Julie Kettlewell: Punch Art Doggy!
Original Pin HERE

Stamp A Latte - Stampin Up! with Leonie Schroder in South West Sydney — for all your papercrafting needs in Sydney South West
Original Pin HERE

I love the three dimension of the valence and dog. MISSING YOU - WOOF by lisa lara - Cards and Paper Crafts at Splitcoaststampers
Original Pin HERE

handmade card: The Spotted Chick: Happy Birthday LouLou! ... kraft base with gel pen faux stitched border ... giant red with white polka dot fills the top third ... cute dog sitting with string in paws ... adorable!!
Original Pin HERE

Here's my 1st of  modified versions
of the above cute card:


I do love cards with lots of
white space...and since we have
a new baby girl next door, I made
a version of this card for her big sister:


Congrats to Corrine!...and while I had everything out,
I made a get well card and one last 
thinking of you card:


I couldn't decide if I liked the black stitch
lines best and decided to add them:


...and after I added them, I think I like the less is more look. I do like the rounded corners, though, as compared to the square corners on the get well card above!

Stamps:
Fluffles the Cat by Stampendous
and Friends SSC217

Also, to get the string to go behind the paw of the cat, to get a light brown color on the cat on the darker brown paper AND to prevent the markers from bleeding through to the inside of the card base, stamp the cat once on the background/card base, stamp it a second time on white card stock, color it with copics and then fancy cut it out so it can be glued over the cat image on the card front.


Friday, April 17, 2015

PIN IT FRIDAY FAVS:
The Very Best of Recent Pins on Pinterest

CALORIE-FREE CUPCAKES
Last week, Splitcoast Stampers featured a cupcake box project for their Wednesday Tutorial HERE by Caroline Hallett. She included this photo of her cupcake boxes in the tutorial: 
Original Pin HERE

Since I had just reorganized my stamping supplies recently and re-discovered my stash of paper flowers that were quite the trend many years ago, I knew they'd be PERFECT for this project! I went to Michael's and bought a package of six 3-inch (76mm) balls, and thankfully, I already had the perfect size of paper cups to cut down to make the cupcake wrapper/base. (Cups were cut down to about 2" to 2 1/4" high.) Here are some of the boxes I made:

 
I used pins to hold the yellow flowers in place...then I tried
something different on my next two cupcake boxes:


After attaching the flowers to the foam ball using hot glue,
I used 3D Shiny Bright Yellow Paint by Scribbles
for the centers in the above two cupcake boxes.

The tops come off and open to reveal a space that can be used to hold a small gift. The inside of the foam ball cut in half is covered with a circle of medium weight DSP. (Circles were cut with Classic Circles Nesties.) To adhere the DSP circles, I used a 1" glue dot to cover the cut surface on some and I also used a low temp hot glue gun on others. Both worked just fine:


Check out the gallery on SCS dedicated to these cupcake boxes HERE...and for cupcake cards to give with this cupcake gift box, check out these Pinterest ideas HERE and my Pinterest cupcake board HERE. Plus....for the ultimate theme in gift giving, you'll want to make up a set of black-bottom cupcakes to go with your box and card! Check out these recipes HERE and my family's favorite recipe for them below and HERE! I also like to add 1 t. of orange zest into the cream cheese mixture because we're big orange chocolate fans and it also looks nice with the orange flecks! No frosting needed for these decadent treats full of deliciousness! I've provided the recipe with the orange zest modification below:


Ultimate Cream Cheese Black Bottom Cupcakes
Yield: 18-20 cupcakes

Ingredients
  • 1 1/2 cup all purpose flour
  • 1 cup sugar
  • 1/2 teaspoon salt
  • 1 teaspoon baking soda
  • 1/4 cup cocoa
  • 1 cup water
  • 1/2 cup oil
  • 1 tablespoon white vinegar
  • 1 teaspoon vanilla extract
  • Filling:
  • 1 (8 ounce) package cream cheese, softened
  • 1 egg
  • 1/2 teaspoon salt
  • 1/3 cup sugar
  • 1 cup mini chocolate chips
  • orange zest, 1 t. (optional)
Instructions
  1. Make your filling first. In a medium bowl, beat cream cheese, egg, sugar and salt until smooth. Stir in chocolate chips and orange zest. Set aside. 
  2. Combine flour, sugar, salt, baking soda and cocoa in a large mixing bowl. Add in remaining ingredients and mix until smooth. Line a cupcake/muffin tin with liners and fill cups 1/2 full. Add one heaping tablespoon of filling into center of each cupcake.
  3. Bake in preheated 350 degree oven 25-30 minutes. Do not over bake. Let cool in pan for 20 minutes before removing to wire racks to cool completely. 
My boss's wife made these for me when I first started in the office on July 3rd, 1979! They are heavenly and one of my most requested recipes!

http://hugsandcookiesxoxo.com/2014/01/ultimate-cream-cheese-black-bottom.html

Friday, April 3, 2015

PIN IT FRIDAY FAVS:
The Very Best of Recent Pins on Pinterest

COLOR ON BLACK CARDS

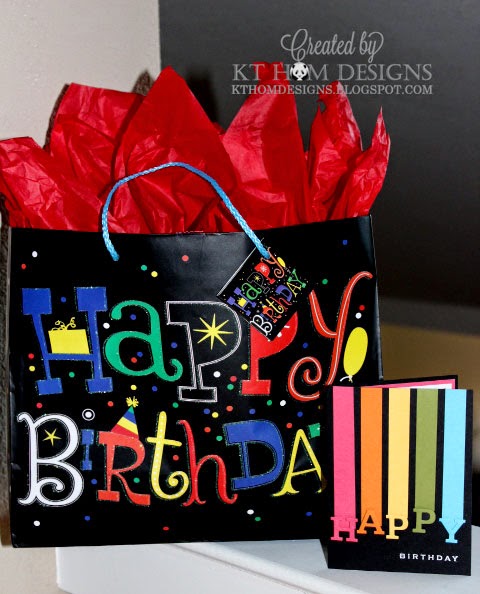
My talented friend and neighbor, Katie, came up with the wonderful design for this card below and I got to make one for my dear FIL's birthday last week --- PLUS I already had a matching bag in my stash of gift bags! Oh! I love when that happens!


I didn't have the die cut for the letters used to make HAPPY, but I did have a small butterfly punch, so I tried making a few similar cards like this:

SENTIMENT:
Elementary Elegance (SU)

The sentiments in white on the above cards are heat embossed and that - along with the colors on black - really makes these cards pop when seen in person! I recalled seeing other black and white cards on Pinterest recently and this one called out to me:

Darling card!
Original Pin HERE

I'll have to try cutting strips of black card stock to make one just like this, but I did have some black and white striped paper already and CASED this idea to make this card:

SENTIMENT:
Heard from the Heart (SU)
LEAVES Made with a
Martha Stewart Punch

Here's one last variation on cards using strips of color and butterflies. This is my next card to make using SU's small butterfly punch and their Papillon Potpourri set. I'll try it using a black card base, too!

butterfly card-stampin up
Original Pin HERE