Happy Dancing

Happy Dancing

Friday, September 26, 2014

PIN IT FRIDAY FAVS:
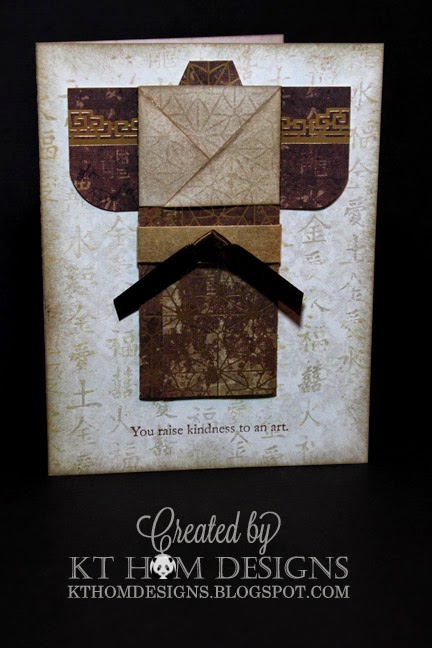
Kimono Cards

I saw this kimono book mark last week at the Sunnyvale Senior Center craft store when I stopped by to visit my friend Alice. It called out my name and I had to buy it!


I thought a much smaller version would make a great card front and here is the result:

Sentiment: SU's Vintage Vogue

...but it seemed that something was missing, and that something was a collar!...so I added that:


While I had everything out, I wanted to make another one...but when I stamped the saying on the second one, it was at a slight angle...so...I chopped off the card front and cut all four sides to align the saying parallel to the bottom edge then matted it on a larger 5"x7" card. I liked the result even better than the first card! Don't you love it when a mistake turns into a happy little opportunity?! 


Back sleeve piece: 3/4" x 1 1/2"
Obi: 3/4" x 1" scored at 1/4" along long side
then folded into the center to
form a final 3/4" x 1/2" obi
Front piece: 5" x 4"
(Fold the left side of the 5" piece to a 1 1/2" point marked
from the right edge and use a bone folder...then fold the
right side over leaving about 1/4" or so from the left-side fold.
The left lapel needs to be trimmed to align it with
the right lapel.)

I sponged Crumb Cake ink on the white side of the paper and to my surprise - the design of the pattern side showed through! (The sponging was done on the lapel and neck areas of the kimono.)

This was the wonderful paper pack I found at Joann's for my Asian papers - half of them with beautiful foiled designs on them:


I also found a video tutorial on Pinterest to make another type of kimono for a card front:

CLICK HERE FOR THE ORIGINAL PIN
and view the tutorial.

I made one using the measurements from the video, but I found it too small when it was finished, so I extended the paper measurements to 3" x 10" - making the second fold in the video at 1-3/4" instead of 1" as stated in the video. Here is the card I made from this video tutorial:


The down side is that is a little bulky to send in the mail...so this will probably be a hand-delivered type of card!  Here are a few other Asian cards I found during my Pinterest searches:

LSC213 Kimono jhg 3_27
CLICK HERE FOR ORIGINAL PIN

Using punches instead of a stamped image for the Asian girl, this card would be a nice one to create: 

Kimono
CLICK HERE FOR THE ORIGINAL PIN

Love this kimono idea as well as the papers used:

Kimono card for Chinese Theme Card Swap
CLICK HERE FOR THE ORIGINAL PIN

The card below uses a SU set called Easter Blooms. This flower pot card could be used for a number of different occasions such as a birthday, get well or sympathy:

Click HERE for the Original Pin

...and this last pin combines fancy and fashion!
Wisteria maiden kimono card - so pretty
CLICK HERE FOR ORIGINAL PIN

Friday, September 19, 2014

PIN IT FRIDAY FAVS:
Baby Cards Galore!

I needed to send out baby cards this week and found loads of inspiration on Pinterest! Here are the ones that caught my eye:


Click HERE for Original Pin and a TEMPLATE HERE

So creative!
Click HERE for the Original Pin

I really liked this one above for a baby boy card and searched for the template, but the creator said she just cut and cut and pretty soon she landed with this idea! Wow! That is talent!...so I set out to create a template of my own...a little while later...this is what I had using a 5"x 6" piece of paper:


I made up my card and realized it needed a bit more pizzazz, so I added a shirt, some buttons, rounded some corners and ended up with this card:


Hello Baby Sentiment: SU Teeny Tiny Wishes

Inside View
Sentiment from Curvy Verses by SU
(The giraffe was purchased as a single
stamp years and years ago! Perhaps Hero Arts?)

For a baby girl card, I made this one using my circle thinlet from Stampin' Up:


Inside View

I cased the sweet little lamb from my talented friend, Rina, who made them for her daughter's baby shower favors --- each little lamb was attached to a bottle of nail polish - the perfect gift for each guest! For my last baby girl card below, I used the lamb again for the inside. This card is going to my wonderful friend, Linda, who just became a grandma to Anabelle:


The lamb head is a 3/4" punch. the ears are a 1/2" punch cut in half and the legs are made from the SU Word Window punch cut in half. The eyes are mini adhesive gems.

While I was searching for baby card ideas on Pinterest, I found tons of clever ideas for gifts and baby shower centerpieces:

Dollar Tree Baby Shower Favors | Baby Shower Ideas
Click HERE for the Original Pin

baby shower gifts for girls | http://best-doityourself-gift-ideas.blogspot.com
Click HERE for the Original Pin

5-Tier "It's A Boy" Diaper Cake @Kelsey Myers Myers Myers Berger I don't expect anything less then this for my 1st baby!! :-)
Click HERE for Original Pin

...finally...what a fantastic idea for baby and wedding showers:

Brilliant!!! Oh my heavens why did we not think of this before I got married?!  It would have made things so much easier, and I probably would have mailed out the thank you's in time too!
Click HERE for Original Pin

Sunday, September 14, 2014

CARD CHICKS:
Fall Meeting

We had another fantastic night of paper crafting with the Card Chicks last Friday night and here are the pics from our fun meeting:

Stampin' Up's Four Feathers and For All Things

Sentiment Inside: Papertrey Ink's Autumn Hills


Ghirardelli Purse Treats

See the Directions at the End of this Post

Envelope Punch Board Mini Treats

For directions, click HERE...and these were the
the sunburst cards we made:


 Inside View

The bats were made using a butterfly punch as shown below:

procrastistamper: Bitty Butterfly & Elegant Butterfly Punch Bats
Original Pin HERE

Here's a slight variation of this technique that I think is easier: Punch out a butterfly in black paper then use the space directly above the negative to punch again to create a bat. 

 Sunburst Variation using Photos
(Bat punch on this card by Martha Stewart)

Variation Three

Sunburst cards are quite simple to make once you learn the secret of using a line down the center of a 5" x 2 3/4" piece of medium weight DSP! Start your own sunburst card using four different pieces of 1 1/2" x 4" pieces of DSP cut on the diagonal then click HERE for the post with the rest of the instructions...and I also shared with my Card Chicks some of the PF Chang's gift card bags that my BIL had received through the years:


...and here's the "after" once they were decorated and recycled for another use:


Tiffany brought each of us some adhesive gems, a spool of sparkling black ribbon and a Ghirardelli chocolate square!...and here's the flashlight I found in the dollar bin at Target. I added a tag and some batteries and voilà!


Now...for the goodies we feasted upon!


...and these YUMMY table snacks that Mel also brought:
Sunshine® Cheez-It® Baked Snack Mix, Original, 4.5 oz.


...and the decorations:

 Lights On

Lights Off


We ended the evening playing this addicting game:

Blokus Game 2014

This is the Pinterest pin below that led me to modifying this paper craft for our Fall Card Chicks Party - I love how they can be modified for any occasion or party!

Modify for any occasion!
Click HERE for the original pin. Click HERE to go directly to Qbee's Quest blog post for the instructions. Here is the set of purse instructions I made for the Card Chicks:


·        On medium weight 11 ½ x 3” DSP, score at 3”,  5 ¾” and 8 ½”
·        If making 4 purses at a time, start with 11 ½” x 12” scored as stated above along the 11 ½” length, then rotate 90 degrees and cut at every 3”
·        Cut in 5/8” from each side at the 5 ¾” score line
·        ON THE PRINT SIDE OF THE PAPER, place 2 medium/large glue dots or ½” sticky tape above and below on each 5/8” cut line
·        Add a piece of 5 ½” ribbon for the purse handle adhering each end at 2 opposite glue dots – angling the ribbon slightly towards the center
·        Fold RIGHT/PRINTED sides together at the 5 ¾” score line and pinch to secure that glue dots stick
·        At the edges furthest away from the fold, add 1/8” sticky tape along each side
·        In the center of each square closest to the center fold, add a glue dot or some sticky tape to hold the chocolate square
·        Adhere a chocolate approx. 1/8” above the score line
·        Lift up each flap to the top and adhere slightly above the 5 ¾” fold
·        Embellish as desired