Happy Dancing

Happy Dancing

Friday, August 18, 2017

PIN IT FRIDAY FAVS:
Double Z Fold Cards
and the Very Best of Pinterest Pins

Check out this lovely 3D double Z card by Dawn’s Stampin’ Thoughts:


Dawn's directions, video tutorial and measurements can be found HERE.

I created several versions and these were my two favs:


I simplified the layers for quick assembly. Here are my modifications for my second card shown above:

Background Z Fold Layer with Vertical Stripes:
  Along the 8 1/2" side of 8 1/2' x 11" piece of DSP medium weight:
  * Cut at 4 1/4″ to create 2 pieces that are 4 1/4″ x 11″
  * Left piece, score at 2 3/4" and 5 1/2" along the 11" side
  * Right piece: Save for a 2nd card
White Z Fold Layer Attached to Background Layer:
  * Cut white cardstock at 3 1/2″ x 8 1/2″, score at 4 1/4" x 2 1/8“ along the 8 1/2″ side
Floral Designer Paper:
* Cut at 4″ x 3 1/4″
* Cut 2 at 1 7/8″ x  3 1/2″
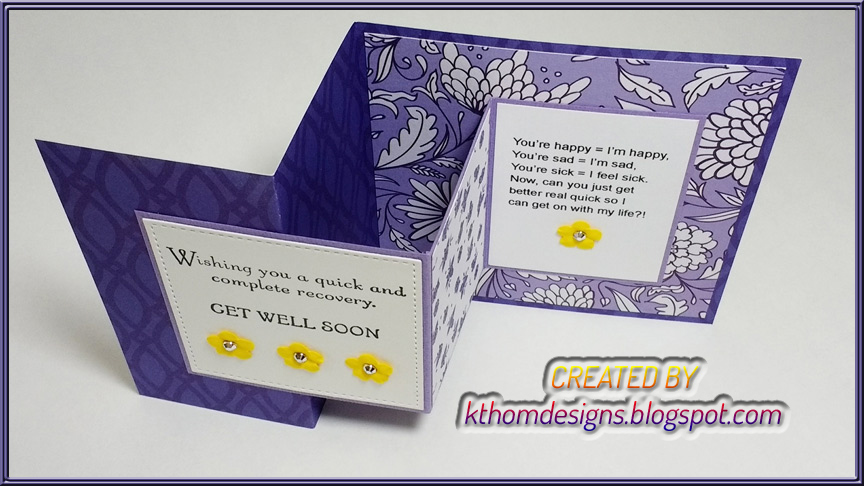
Sentiment Panels:
* Cut white cardstock at 3 3/8″x 2 5/8″ and 1 7/8“ x 1 3/4“


After I finished making this double Z version, I saw a square version on Pinterest by Jeanie Stark:
I like this version because when it's opened, the two layers are perfectly parallel and that appeals to my sense of balance! The first version at the top of this post does not have parallel insides like this card:
For measurements and instructions, click HERE.
These instructions make a 4 1/4" square double Z card. I made this square version plus I modified the design to make another one that was the traditional 4 1/4" x 5 1/2" version. Here are the results:
SQUARE VERSION


TRADITIONAL A2 SIZE VERSION 

Left side sentiment:
SU Thoughts and Prayers
The right side sentiment was done on my computer and modified from a sentiment I saw on Pinterest:
You’re happy = I’m happy,
You’re sad = I’m sad,
You’re sick = I feel sick.
Now, can you just get
better real quick so I
can get on with my life?!


SIZE COMPARISON OF BOTH VERSIONS

MY DOUBLE Z CARDS:

A Large Version


6” wide by 5” finished card size

Base = 5” x 12”, scored along 12” at 3” and 6”

Inside Z = 3.5” x 9”, scored along 9” at 4” and 6.5”

Third piece under Z piece on right side of base = 3 3/8” wide x 4 1/4”

Glue the third piece behind the far right panel of the inside Z piece then watch the video https://tinyurl.com/doublezcard at the 8 minute mark to see one way to glue a Double Z card together.


For a Small Version (that fits into A2 envelope):


Base = 8 ½” x 5.5” scored along 8.5” at 2 1/8” and 4 1/4”


Far right panel: 4” x 5 ¼” coordinating DSP


Skip to “Inside Z” below if using double-sided paper


Far left panel DSP: 1 7/8” w x 5 1/4” h (Width and height noted in case the paper’s pattern orientation makes a difference. The first cut will be the width with the paper pattern going in the correct direction.) *Cut 2 pieces if you wish to put paper on inside panel - see arrow above


For right panel DSP: 4” w x 5 1/4” h 


Inside Z = 3 7/8" x 7”, scored along 7” at 2 1/2” x 4 3/4”


White card stock for sentiment: 2 1/4“ x 3 5/8”


For remaining panels of DSP: Cut two at 2” w x 3 5/8” h


Note: Adding a piece of 4” x 5 ¼” coordinating DSP on the far right panel of the base adds a nice effect when the card is closed. Paste this piece first before adding the Z.


These double Z cards are so much fun to make and the photos don't do them justice compared to when you see them in person. Give them a try! Here are a few more double Z variations to make you smile:

For Original Pin, Click HERE
For more examples of double z cards, check out this gallery of Pinterest pins for all occasions HERE.

Friday, August 11, 2017

PIN IT FRIDAY FAVS:
Purses and the
Very Best of Pinterest Pins

I'm happy to report that I'm back after a three-month break in blogging! I have been on quite the roller coaster ride during that time, but thankfully, my determined husband is successfully making his way back from having a stroke on April 29th. Life is so precious and I hold that thought in my heart and mind even more now. My family is immeasurably grateful for all the love received from friends and family that cheered us on and up during these past months!

My 93-year-old friend's birthday is this month and I wanted to make this purse for her that I saw on Pinterest, of course!


You can find the tutorial by clicking HERE.

The finished size is quite large and makes a stunning box to hold a little gift or some candy. Here's my version:


White leaf die used was:
FLOURISH THINLITS by Stampin' Up

My mind is spinning with all of the possibilities for purses year-round using holiday double-sided paper, and boy oh! boy, do I have stashes of that kind of paper squirreled away!

Here are a few more versions that I made while everything was pulled out and my craft room already looked like a bomb had gone off!


The scoring is a bit difficult because you can't put your paper on a score board to create the diagonal scoring. I used a straight edge and a ruler on top of some craft foam and that worked beautifully!...but then the light bulb in my head went off and I realized that you can fold up the bottom third of the paper after it's scored and then you can use your Fiskars scoring tool perfectly!


Use the metal wire to line up the score line:


Open the ruler to the right and locate the
score slot at the top of the scorer
to start the score line:


When the Velcro closure of the flap is lifted up, the purse opens like an explosion card and this is what the inside of my purse looks like:


Top Sentiment = My Computer
Lower Sentiment = SU Balloon Adventures

Visit Lizzie's blog HERE to see the step-by-step tutorial pics and view the explosion effect. I hope you make someone happy with your paper creations soon. It sure feels good to be able to do that again!