Happy Dancing

Happy Dancing

Friday, July 29, 2016

PIN IT FRIDAY FAVS:
Huge Flowers and the
Very Best of Pinterest Pins

I did a really BIG happy dance when I saw these really BIG flowers from Becky Robert's Inkin' Idaho blog which also included a video tutorial that was super helpful:

Original Pin HERE

This pic from her blog will give you a size perspective:


...and here is my version:


Becky provides the FREE petal templates and a wonderful how-to video HERE to make this flower using 5 each of the large, medium and small petals.

Instead of using 10 sheets of 8.5" x 11", I was able to make one out of 7.5 sheets by using this layout of traced templates:


To make the leaves, I took a 8.5" x 11" sheet of green card stock, scored it down the middle, folded it in half then traced a leaf that went the entire length of the card stock. 


After curling the leaves just as Becky shows for the petals, I put a slit in the bottom of the leaf as well and used hot glue just like Becky shows for the petals in her video. I gave this mega flower to my dear MIL and she loved it! 

Using a different petal shape, I recently made a nesting of three flowers in 3 shades of complimentary blues for my dining room table:


...and for my future DIL's shower, I made these
flowers and banner:


Since I know I'll be making more of these flowers, I imported the templates into my Cricut to make the cutting of the petals so much faster and easier! For more huge paper flower ideas and templates, check out these ideas on Pinterest.

Friday, July 22, 2016

PIN IT FRIDAY FAVS:
A Gift Idea and the
Very Best of Pinterest Pins

LOVE this quick & easy money/gift card wallet idea:


Unfotunately, Pinterest wouldn't let me pin the pics
due to concerns about spam, so to view the
wonderful tutorial and video go to the blog called
genstampin4fun or click HERE.

To make, start with a piece of cardstock that measures
4 1/4" x 11"

Score along the 11" side at 3 5/8" from both
the right and left sides.

Along the 4 1/4" side, score at 3"
then follow the video.

I'm been having loads of fun with some beautiful stamp sets from Rubbernecker that creates the look of watercolor painting. This is one of my new favorites called POPPY TRIO #869:


The MISTI allows me to get a dense black image
over the colored flowers. Best money every spent!

I used a clear Wink of Stella brush to apply a micro fine
glitter and sparkle effect on all of the flowers -
and in person, the card pops!


Here's one more new stamp set from Rubbernecker
that I borrowed from my friend, Mel - then had to buy
for myself  because I loved it!


This set is called:
WATERCOLOR POPPIES #179

I used water-based markers directly on the stamp, spritzed it with a lot of water then stamped on watercolor paper. While the ink was still wet, I then added more paint directly to the stamped image using a kids' watercolor paint set! This allowed me to intensify and blend colors as needed. A watercolor pad that I recently discovered from another site is Fabriano Studio Watercolor Paper. It's ideal for stamping because it does not have pronounced ridges in it. Affordable, too! Check it out HERE.

Friday, July 8, 2016

PIN IT FRIDAY FAVS:
Birthday Cakes and the
Very Best of Pinterest Pins

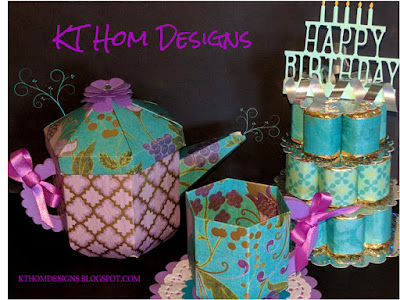
I had a chance to make another tea pot and tea cup set last week plus I added a birthday cake idea I saw on Pinterest:


The tea pot and cup with the measurements and
video was shown in my post HERE...
then...I started seeing these adorable Hershey Nugget
cakes all over Pinterest and decided to create some
color coordinated trios!


(Happy Birthday die from Stampin' Up)

The directions on one of the Pinterest cakes
used a styrofoam ball cut in half, but that seemed like
a lot of mess...so I came up with a much easier solution.


I adhered the Nuggets to a 1" x 8" strip of black card stock - using red sticky tape to attach the Nuggets side-by-side to the strip while I curved it to form a circle. I trimmed the strip and left a tab to attach the last Nugget to the first Nugget. I simply hot glued the Nuggets to the heavy card stock small scalloped circle bases (made with Nesties). I also applied yellow Stickles paint to the candle tips to make them stand out. My formula for the construction was 7 Nuggets for the base, 6 for the middle layer and 5 for the top layer.

Here are a few more Pinterest pins of Hershey Nugget cakes:

 Original Pin HERE

 Original Pin HERE

Original Pin HERE

...and some with a tea light for the top layer:

 Original Pin HERE

Original Pin HERE

The creativity incorporated into these cakes
really makes me smile ^_^
BTW: My Safeway sells a huge bag of Nuggets
and it seems that they have a new customer
since I discovered how to make no-bake cakes!

I can tell you first-hand that these cakes
will bring your friends and family
a lot of happiness!